XML

When you send XML data via HTTP, it makes sense to use JSP to handle incoming and outgoing XML documents for example RSS documents. As an XML document is merely a bunch of text, creating one through a JSP is no more difficult than creating an HTML document.

Sending XML from a JSP:

You can send XML content using JSPs the same way you send HTML. The only difference is that you must set the content type of your page to text/xml. To set the content type, use the <%@page%> tag, like this:

<%@ page contentType="text/xml" %>

Following is a simple example to send XML content to the browser:

<%@ page contentType="text/xml" %>

<books>
   <book>
      <name>Padam History</name>
      <author>ZARA</author>
      <price>100</price>
   </book>
</books>

Try to access above XML using different browsers to see the document tree presentation of the above XML.

Processing XML in JSP:

Before you proceed with XML processing using JSP, you would need to copy following two XML and XPath related libraries into your <Tomcat Installation Directory>\lib:

Let us put following content in books.xml file:

<books>
<book>
  <name>Padam History</name>
  <author>ZARA</author>
  <price>100</price>
</book>
<book>
  <name>Great Mistry</name>
  <author>NUHA</author>
  <price>2000</price>
</book>
</books>

Now try the following main.jsp, keeping in the same directory:

<%@ taglib prefix="c" uri="http://java.sun.com/jsp/jstl/core" %>
<%@ taglib prefix="x" uri="http://java.sun.com/jsp/jstl/xml" %>
 
<html>
<head>
  <title>JSTL x:parse Tags</title>
</head>
<body>
<h3>Books Info:</h3>
<c:import var="bookInfo" url="http://localhost:8080/books.xml"/>
 
<x:parse xml="${bookInfo}" var="output"/>
<b>The title of the first book is</b>: 
<x:out select="$output/books/book[1]/name" />
<br>
<b>The price of the second book</b>: 
<x:out select="$output/books/book[2]/price" />
 
</body>
</html>

Now try to access above JSP using http://localhost:8080/main.jsp, this would produce following result:

Books Info:

The title of the first book is:Padam History

The price of the second book: 2000

Formatting XML with JSP:

Consider the following XSLT stylesheet style.xsl:

<?xml version="1.0"?>
<xsl:stylesheet xmlns:xsl=
"http://www.w3.org/1999/XSL/Transform" version="1.0">
 
<xsl:output method="html" indent="yes"/>
 
<xsl:template match="/">
  <html>
  <body>
   <xsl:apply-templates/>
  </body>
  </html>
</xsl:template>
 
<xsl:template match="books">
  <table border="1" width="100%">
    <xsl:for-each select="book">
      <tr>
        <td>
          <i><xsl:value-of select="name"/></i>
        </td>
        <td>
          <xsl:value-of select="author"/>
        </td>
        <td>
          <xsl:value-of select="price"/>
        </td>
      </tr>
    </xsl:for-each>
  </table>
</xsl:template>
</xsl:stylesheet>

Now consider the following JSP file:

<%@ taglib prefix="c" uri="http://java.sun.com/jsp/jstl/core" %>
<%@ taglib prefix="x" uri="http://java.sun.com/jsp/jstl/xml" %>
 
<html>
<head>
  <title>JSTL x:transform Tags</title>
</head>
<body>
<h3>Books Info:</h3>
<c:set var="xmltext">
  <books>
    <book>
      <name>Padam History</name>
      <author>ZARA</author>
      <price>100</price>
    </book>
    <book>
      <name>Great Mistry</name>
      <author>NUHA</author>
      <price>2000</price>
    </book>
  </books>
</c:set>
 
<c:import url="http://localhost:8080/style.xsl" var="xslt"/>
<x:transform xml="${xmltext}" xslt="${xslt}"/>
 
</body>
</html>

This would produce following result:

Books Info:

Padam History ZARA 100
Great Mistry NUHA 2000

For more detail on XML processing using JSTL, you can check JSP Standard Tag Library

SESSION TRACKING

HTTP is a “stateless” protocol which means each time a client retrieves a Web page, the client opens a separate connection to the Web server and the server automatically does not keep any record of previous client request.

Still there are following three ways to maintain session between web client and web server:

Cookies:

A webserver can assign a unique session ID as a cookie to each web client and for subsequent requests from the client they can be recognized using the received cookie.

This may not be an effective way because many time browser does not support a cookie, so I would not recommend to use this procedure to maintain the sessions.

Hidden Form Fields:

A web server can send a hidden HTML form field along with a unique session ID as follows:

<input type="hidden" name="sessionid" value="12345">

This entry means that, when the form is submitted, the specified name and value are automatically included in the GET or POST data. Each time when web browser sends request back, then session_id value can be used to keep the track of different web browsers.

This could be an effective way of keeping track of the session but clicking on a regular (<A HREF…>) hypertext link does not result in a form submission, so hidden form fields also cannot support general session tracking.

URL Rewriting:

You can append some extra data on the end of each URL that identifies the session, and the server can associate that session identifier with data it has stored about that session.

For example, with http://tutorialspoint.com/file.htm;sessionid=12345, the session identifier is attached as sessionid=12345 which can be accessed at the web server to identify the client.

URL rewriting is a better way to maintain sessions and works for the browsers when they don’t support cookies but here drawback is that you would have generate every URL dynamically to assign a session ID though page is simple static HTML page.

The session Object:

Apart from the above mentioned three ways, JSP makes use of servlet provided HttpSession Interface which provides a way to identify a user across more than one page request or visit to a Web site and to store information about that user.

By default, JSPs have session tracking enabled and a new HttpSession object is instantiated for each new client automatically. Disabling session tracking requires explicitly turning it off by setting the page directive session attribute to false as follows:

<%@ page session="false" %>

The JSP engine exposes the HttpSession object to the JSP author through the implicit session object. Since session object is already provided to the JSP programmer, the programmer can immediately begin storing and retrieving data from the object without any initialization or getSession().

Here is a summary of important methods available through session object:

S.N. Method & Description
1 public Object getAttribute(String name)
This method returns the object bound with the specified name in this session, or null if no object is bound under the name.
2 public Enumeration getAttributeNames()
This method returns an Enumeration of String objects containing the names of all the objects bound to this session.
3 public long getCreationTime()
This method returns the time when this session was created, measured in milliseconds since midnight January 1, 1970 GMT.
4 public String getId()
This method returns a string containing the unique identifier assigned to this session.
5 public long getLastAccessedTime()
This method returns the last time the client sent a request associated with this session, as the number of milliseconds since midnight January 1, 1970 GMT.
6 public int getMaxInactiveInterval()
This method returns the maximum time interval, in seconds, that the servlet container will keep this session open between client accesses.
7 public void invalidate()
This method invalidates this session and unbinds any objects bound to it.
8 public boolean isNew(
This method returns true if the client does not yet know about the session or if the client chooses not to join the session.
9 public void removeAttribute(String name)
This method removes the object bound with the specified name from this session.
10 public void setAttribute(String name, Object value)
This method binds an object to this session, using the name specified.
11 public void setMaxInactiveInterval(int interval)
This method specifies the time, in seconds, between client requests before the servlet container will invalidate this session.

Session Tracking Example:

This example describes how to use the HttpSession object to find out the creation time and the last-accessed time for a session. We would associate a new session with the request if one does not already exist.

<%@ page import="java.io.*,java.util.*" %>
<%
   // Get session creation time.
   Date createTime = new Date(session.getCreationTime());
   // Get last access time of this web page.
   Date lastAccessTime = new Date(session.getLastAccessedTime());

   String title = "Welcome Back to my website";
   Integer visitCount = new Integer(0);
   String visitCountKey = new String("visitCount");
   String userIDKey = new String("userID");
   String userID = new String("ABCD");

   // Check if this is new comer on your web page.
   if (session.isNew()){
      title = "Welcome to my website";
      session.setAttribute(userIDKey, userID);
      session.setAttribute(visitCountKey,  visitCount);
   } 
   visitCount = (Integer)session.getAttribute(visitCountKey);
   visitCount = visitCount + 1;
   userID = (String)session.getAttribute(userIDKey);
   session.setAttribute(visitCountKey,  visitCount);
%>
<html>
<head>
<title>Session Tracking</title>
</head>
<body>
<center>
<h1>Session Tracking</h1>
</center>
<table border="1" align="center"> 
<tr bgcolor="#949494">
   <th>Session info</th>
   <th>Value</th>
</tr> 
<tr>
   <td>id</td>
   <td><% out.print( session.getId()); %></td>
</tr> 
<tr>
   <td>Creation Time</td>
   <td><% out.print(createTime); %></td>
</tr> 
<tr>
   <td>Time of Last Access</td>
   <td><% out.print(lastAccessTime); %></td>
</tr> 
<tr>
   <td>User ID</td>
   <td><% out.print(userID); %></td>
</tr> 
<tr>
   <td>Number of visits</td>
   <td><% out.print(visitCount); %></td>
</tr> 
</table> 
</body>
</html>

Now put above code in main.jsp and try to accesshttp://localhost:8080/main.jsp. It would display the following result when you would run for the first time:

Welcome to my website

Session Infomation

Session info value
id 0AE3EC93FF44E3C525B4351B77ABB2D5
Creation Time Tue Jun 08 17:26:40 GMT+04:00 2010
Time of Last Access Tue Jun 08 17:26:40 GMT+04:00 2010
User ID ABCD
Number of visits 0

Now try to run the same JSP for second time, it would display following result.

Welcome Back to my website

Session Infomation

info type value
id 0AE3EC93FF44E3C525B4351B77ABB2D5
Creation Time Tue Jun 08 17:26:40 GMT+04:00 2010
Time of Last Access Tue Jun 08 17:26:40 GMT+04:00 2010
User ID ABCD
Number of visits 1

Deleting Session Data:

When you are done with a user’s session data, you have several options:

  • Remove a particular attribute: You can call public void removeAttribute(String name) method to delete the value associated with a particular key.
  • Delete the whole session: You can call public void invalidate()method to discard an entire session.
  • Setting Session timeout: You can call public void setMaxInactiveInterval(int interval) method to set the timeout for a session individually.
  • Log the user out: The servers that support servlets 2.4, you can calllogout to log the client out of the Web server and invalidate all sessions belonging to all the users.
  • web.xml Configuration: If you are using Tomcat, apart from the above mentioned methods, you can configure session time out in web.xml file as follows.
  <session-config>
    <session-timeout>15</session-timeout>
  </session-config>

The timeout is expressed as minutes, and overrides the default timeout which is 30 minutes in Tomcat.

The getMaxInactiveInterval( ) method in a servlet returns the timeout period for that session in seconds. So if your session is configured in web.xml for 15 minutes, getMaxInactiveInterval( ) returns 900.

FILTER

Servlet and JSP Filters are Java classes that can be used in Servlet and JSP Programming for the following purposes:

  • To intercept requests from a client before they access a resource at back end.
  • To manipulate responses from server before they are sent back to the client.

There are various types of filters suggested by the specifications:

  • Authentication Filters.
  • Data compression Filters
  • Encryption Filters .
  • Filters that trigger resource access events.
  • Image Conversion Filters .
  • Logging and Auditing Filters.
  • MIME-TYPE Chain Filters.
  • Tokenizing Filters .
  • XSL/T Filters That Transform XML Content.

Filters are deployed in the deployment descriptor file web.xml and then map to either servlet or JSP names or URL patterns in your application’s deployment descriptor. The deployment descriptor file web.xml can be found in <Tomcat-installation-directory>\conf directory.

When the JSP container starts up your web application, it creates an instance of each filter that you have declared in the deployment descriptor. The filters execute in the order that they are declared in the deployment descriptor.

Servlet Filter Methods:

A filter is simply a Java class that implements the javax.servlet.Filter interface. The javax.servlet.Filter interface defines three methods:

S.N. Method & Description
1 public void doFilter (ServletRequest, ServletResponse, FilterChain)

This method is called by the container each time a request/response pair is passed through the chain due to a client request for a resource at the end of the chain.

2 public void init(FilterConfig filterConfig)

This method is called by the web container to indicate to a filter that it is being placed into service.

3 public void destroy()

This method is called by the web container to indicate to a filter that it is being taken out of service.

JSP Filter Example:

Following is the JSP Filter Example that would print the clients IP address and current date time each time it would access any JSP file. This example would give you basic understanding of JSP Filter, but you can write more sophisticated filter applications using the same concept:

// Import required java libraries
import java.io.*;
import javax.servlet.*;
import javax.servlet.http.*;
import java.util.*;
 
// Implements Filter class
public class LogFilter implements Filter  {
   public void  init(FilterConfig config) 
                         throws ServletException{
      // Get init parameter 
      String testParam = config.getInitParameter("test-param"); 
 
      //Print the init parameter 
      System.out.println("Test Param: " + testParam); 
   }
   public void  doFilter(ServletRequest request, 
                 ServletResponse response,
                 FilterChain chain) 
                 throws java.io.IOException, ServletException {
 
      // Get the IP address of client machine.   
      String ipAddress = request.getRemoteAddr();
 
      // Log the IP address and current timestamp.
      System.out.println("IP "+ ipAddress + ", Time "
                                       + new Date().toString());
 
      // Pass request back down the filter chain
      chain.doFilter(request,response);
   }
   public void destroy( ){
      /* Called before the Filter instance is removed 
      from service by the web container*/
   }
}

Compile LogFilter.java in usual way and put your LogFilter.class class file in <Tomcat-installation-directory>/webapps/ROOT/WEB-INF/classes.

JSP Filter Mapping in Web.xml:

Filters are defined and then mapped to a URL or JSP file name, in much the same way as Servlet is defined and then mapped to a URL pattern in web.xml file. Create the following entry for filter tag in the deployment descriptor fileweb.xml

<filter>
   <filter-name>LogFilter</filter-name>
   <filter-class>LogFilter</filter-class>
   <init-param>
	  <param-name>test-param</param-name>
	  <param-value>Initialization Paramter</param-value>
   </init-param>
</filter>
<filter-mapping>
   <filter-name>LogFilter</filter-name>
   <url-pattern>/*</url-pattern>
</filter-mapping>

The above filter would apply to all the servlets and JSP because we specified /*in our configuration. You can specify a particular servlet or JSP path if you want to apply filter on few servlets or JSP only.

Now try to call any servlet or JSP in usual way and you would see generated log in you web server log. You can use Log4J logger to log above log in a separate file.

Using Multiple Filters:

Your web application may define several different filters with a specific purpose. Consider, you define two filters AuthenFilter and LogFilter. Rest of the process would remain as explained above except you need to create a different mapping as mentioned below:

<filter>
   <filter-name>LogFilter</filter-name>
   <filter-class>LogFilter</filter-class>
   <init-param>
	  <param-name>test-param</param-name>
	  <param-value>Initialization Paramter</param-value>
   </init-param>
</filter>
 
<filter>
   <filter-name>AuthenFilter</filter-name>
   <filter-class>AuthenFilter</filter-class>
   <init-param>
	  <param-name>test-param</param-name>
	  <param-value>Initialization Paramter</param-value>
   </init-param>
</filter>
 
<filter-mapping>
   <filter-name>LogFilter</filter-name>
   <url-pattern>/*</url-pattern>
</filter-mapping>
 
<filter-mapping>
   <filter-name>AuthenFilter</filter-name>
   <url-pattern>/*</url-pattern>
</filter-mapping>

Filters Application Order:

The order of filter-mapping elements in web.xml determines the order in which the web container applies the filter to the servlet or JSP. To reverse the order of the filter, you just need to reverse the filter-mapping elements in the web.xml file.

For example, above example would apply LogFilter first and then it would apply AuthenFilter to any servlet or JSP but the following example would reverse the order:

<filter-mapping>
   <filter-name>AuthenFilter</filter-name>
   <url-pattern>/*</url-pattern>
</filter-mapping>
 
<filter-mapping>
   <filter-name>LogFilter</filter-name>
   <url-pattern>/*</url-pattern>
</filter-mapping>

Cookies are text files stored on the client computer and they are kept for various information tracking purpose. JSP transparently supports HTTP cookies using underlying servlet technology.

There are three steps involved in identifying returning users:

  • Server script sends a set of cookies to the browser. For example name, age, or identification number etc.
  • Browser stores this information on local machine for future use.
  • When next time browser sends any request to web server then it sends those cookies information to the server and server uses that information to identify the user or may be for some other purpose as well.

This chapter will teach you how to set or reset cookies, how to access them and how to delete them using JSP programs.

The Anatomy of a Cookie:

Cookies are usually set in an HTTP header (although JavaScript can also set a cookie directly on a browser). A JSP that sets a cookie might send headers that look something like this:

HTTP/1.1 200 OK
Date: Fri, 04 Feb 2000 21:03:38 GMT
Server: Apache/1.3.9 (UNIX) PHP/4.0b3
Set-Cookie: name=xyz; expires=Friday, 04-Feb-07 22:03:38 GMT; 
                 path=/; domain=tutorialspoint.com
Connection: close
Content-Type: text/html

As you can see, the Set-Cookie header contains a name value pair, a GMT date, a path and a domain. The name and value will be URL encoded. The expires field is an instruction to the browser to “forget” the cookie after the given time and date.

If the browser is configured to store cookies, it will then keep this information until the expiry date. If the user points the browser at any page that matches the path and domain of the cookie, it will resend the cookie to the server. The browser’s headers might look something like this:

GET / HTTP/1.0
Connection: Keep-Alive
User-Agent: Mozilla/4.6 (X11; I; Linux 2.2.6-15apmac ppc)
Host: zink.demon.co.uk:1126
Accept: image/gif, */*
Accept-Encoding: gzip
Accept-Language: en
Accept-Charset: iso-8859-1,*,utf-8
Cookie: name=xyz

A JSP script will then have access to the cookies through the request methodrequest.getCookies() which returns an array of Cookie objects.

Servlet Cookies Methods:

Following is the list of useful methods associated with Cookie object which you can use while manipulating cookies in JSP:

S.N. Method & Description
1 public void setDomain(String pattern)

This method sets the domain to which cookie applies, for example tutorialspoint.com.

2 public String getDomain()

This method gets the domain to which cookie applies, for example tutorialspoint.com.

3 public void setMaxAge(int expiry)

This method sets how much time (in seconds) should elapse before the cookie expires. If you don’t set this, the cookie will last only for the current session.

4 public int getMaxAge()

This method returns the maximum age of the cookie, specified in seconds, By default, -1 indicating the cookie will persist until browser shutdown.

5 public String getName()

This method returns the name of the cookie. The name cannot be changed after creation.

6 public void setValue(String newValue)

This method sets the value associated with the cookie.

7 public String getValue()

This method gets the value associated with the cookie.

8 public void setPath(String uri)

This method sets the path to which this cookie applies. If you don’t specify a path, the cookie is returned for all URLs in the same directory as the current page as well as all subdirectories.

9 public String getPath()

This method gets the path to which this cookie applies.

10 public void setSecure(boolean flag)

This method sets the boolean value indicating whether the cookie should only be sent over encrypted (i.e. SSL) connections.

11 public void setComment(String purpose)

This method specifies a comment that describes a cookie’s purpose. The comment is useful if the browser presents the cookie to the user.

12 public String getComment()

This method returns the comment describing the purpose of this cookie, or null if the cookie has no comment.

Setting Cookies with JSP:

Setting cookies with JSP involves three steps:

(1) Creating a Cookie object: You call the Cookie constructor with a cookie name and a cookie value, both of which are strings.

Cookie cookie = new Cookie("key","value");

Keep in mind, neither the name nor the value should contain white space or any of the following characters:

[ ] ( ) = , " / ? @ : ;

(2) Setting the maximum age: You use setMaxAge to specify how long (in seconds) the cookie should be valid. Following would set up a cookie for 24 hours.

cookie.setMaxAge(60*60*24);

(3) Sending the Cookie into the HTTP response headers: You useresponse.addCookie to add cookies in the HTTP response header as follows:

response.addCookie(cookie);

Example:

Let us modify our Form Example to set the cookies for first and last name.

<%
   // Create cookies for first and last names.      
   Cookie firstName = new Cookie("first_name",
 			  request.getParameter("first_name"));
   Cookie lastName = new Cookie("last_name",
			  request.getParameter("last_name"));

   // Set expiry date after 24 Hrs for both the cookies.
   firstName.setMaxAge(60*60*24); 
   lastName.setMaxAge(60*60*24); 

   // Add both the cookies in the response header.
   response.addCookie( firstName );
   response.addCookie( lastName );
%>
<html>
<head>
<title>Setting Cookies</title>
</head>
<body>
<center>
<h1>Setting Cookies</h1>
</center>
<ul>
<li><p><b>First Name:</b>
   <%= request.getParameter("first_name")%>
</p></li>
<li><p><b>Last  Name:</b>
   <%= request.getParameter("last_name")%>
</p></li>
</ul>
</body>
</html>

Let us put above code in main.jsp file and use it in the following HTML page:

 
<html>
<body>
<form action="main.jsp" method="GET">
First Name: <input type="text" name="first_name">
<br />
Last Name: <input type="text" name="last_name" />
<input type="submit" value="Submit" />
</form>
</body>
</html>

Keep above HTML content in a file hello.jsp and put hello.jsp and main.jsp in <Tomcat-installation-directory>/webapps/ROOT directory. When you would access http://localhost:8080/hello.jsp, here is the actual output of the above form.

First Name:
Last Name: Try to enter First Name and Last Name and then click submit button. This would display first name and last name on your screen and same time it would set two cookies firstName and lastName which would be passed back to the server when next time you would press Submit button.

Next section would explain you how you would access these cookies back in your web application.

Reading Cookies with JSP:

To read cookies, you need to create an array of javax.servlet.http.Cookieobjects by calling the getCookies( ) method of HttpServletRequest. Then cycle through the array, and use getName() and getValue() methods to access each cookie and associated value.

Example:

Let us read cookies which we have set in previous example:

<html>
<head>
<title>Reading Cookies</title>
</head>
<body>
<center>
<h1>Reading Cookies</h1>
</center>
<%
   Cookie cookie = null;
   Cookie[] cookies = null;
   // Get an array of Cookies associated with this domain
   cookies = request.getCookies();
   if( cookies != null ){
      out.println("<h2> Found Cookies Name and Value</h2>");
      for (int i = 0; i < cookies.length; i++){
         cookie = cookies[i];
         out.print("Name : " + cookie.getName( ) + ",  ");
         out.print("Value: " + cookie.getValue( )+" <br/>");
      }
  }else{
      out.println("<h2>No cookies founds</h2>");
  }
%>
</body>
</html>

Now let us put above code in main.jsp file and try to access it. If you would have set first_name cookie as “John” and last_name cookie as “Player” then running http://localhost:8080/main.jsp would display the following result:

Found Cookies Name and Value

Name : first_name, Value: John

Name : last_name, Value: Player

Delete Cookies with JSP:

To delete cookies is very simple. If you want to delete a cookie then you simply need to follow up following three steps:

  • Read an already existing cookie and store it in Cookie object.
  • Set cookie age as zero using setMaxAge() method to delete an existing cookie.
  • Add this cookie back into response header.

Example:

Following example would delete and existing cookie named “first_name” and when you would run main.jsp JSP next time it would return null value for first_name.

<html>
<head>
<title>Reading Cookies</title>
</head>
<body>
<center>
<h1>Reading Cookies</h1>
</center>
<%
   Cookie cookie = null;
   Cookie[] cookies = null;
   // Get an array of Cookies associated with this domain
   cookies = request.getCookies();
   if( cookies != null ){
      out.println("<h2> Found Cookies Name and Value</h2>");
      for (int i = 0; i < cookies.length; i++){
         cookie = cookies[i];
         if((cookie.getName( )).compareTo("first_name") == 0 ){
            cookie.setMaxAge(0);
            response.addCookie(cookie);
            out.print("Deleted cookie: " + 
            cookie.getName( ) + "<br/>");
         }
         out.print("Name : " + cookie.getName( ) + ",  ");
         out.print("Value: " + cookie.getValue( )+" <br/>");
      }
  }else{
      out.println(
      "<h2>No cookies founds</h2>");
  }
%>
</body>
</html>

Now let us put above code in main.jsp file and try to access it. It would display the following result:

Cookies Name and Value

Deleted cookie : first_name

Name : first_name, Value: John

Name : last_name, Value: Player

Now try to run http://localhost:8080/main.jsp once again and it should display only one cookie as follows:

Found Cookies Name and Value

Name : last_name,  Value: Player

REQUEST-RESPONSE(JSP)

When a browser requests for a web page, it sends lot of information to the web server which can not be read directly because this information travel as a part of header of HTTP request. You can check HTTP Protocol for more information on this.

Following is the important header information which comes from browser side and you would use very frequently in web programming:

Header Description
Accept This header specifies the MIME types that the browser or other clients can handle. Values of image/png orimage/jpeg are the two most common possibilities.
Accept-Charset This header specifies the character sets the browser can use to display the information. For example ISO-8859-1.
Accept-Encoding This header specifies the types of encodings that the browser knows how to handle. Values of gzip orcompress are the two most common possibilities.
Accept-Language This header specifies the client’s preferred languages in case the servlet can produce results in more than one language. For example en, en-us, ru, etc.
Authorization This header is used by clients to identify themselves when accessing password-protected Web pages.
Connection This header indicates whether the client can handle persistent HTTP connections. Persistent connections permit the client or other browser to retrieve multiple files with a single request. A value of Keep-Alive means that persistent connections should be used
Content-Length This header is applicable only to POST requests and gives the size of the POST data in bytes.
Cookie This header returns cookies to servers that previously sent them to the browser.
Host This header specifies the host and port as given in the original URL.
If-Modified-Since This header indicates that the client wants the page only if it has been changed after the specified date. The server sends a code, 304 which means Not Modifiedheader if no newer result is available.
If-Unmodified-Since This header is the reverse of If-Modified-Since; it specifies that the operation should succeed only if the document is older than the specified date.
Referer This header indicates the URL of the referring Web page. For example, if you are at Web page 1 and click on a link to Web page 2, the URL of Web page 1 is included in the Referer header when the browser requests Web page 2.
User-Agent This header identifies the browser or other client making the request and can be used to return different content to different types of browsers.

The HttpServletRequest Object:

The request object is an instance of a javax.servlet.http.HttpServletRequest object. Each time a client requests a page the JSP engine creates a new object to represent that request.

The request object provides methods to get HTTP header information including form data, cookies, HTTP methods etc.

There are following important methods which can be used to read HTTP header in your JSP program. These method are available with HttpServletRequestobject which represents client request to webserver.

S.N. Method & Description
1 Cookie[] getCookies()

Returns an array containing all of the Cookie objects the client sent with this request.

2 Enumeration getAttributeNames()

Returns an Enumeration containing the names of the attributes available to this request.

3 Enumeration getHeaderNames()

Returns an enumeration of all the header names this request contains.

4 Enumeration getParameterNames()

Returns an Enumeration of String objects containing the names of the parameters contained in this request.

5 HttpSession getSession()

Returns the current session associated with this request, or if the request does not have a session, creates one.

6 HttpSession getSession(boolean create)

Returns the current HttpSession associated with this request or, if if there is no current session and create is true, returns a new session.

7 Locale getLocale()

Returns the preferred Locale that the client will accept content in, based on the Accept-Language header

8 Object getAttribute(String name)

Returns the value of the named attribute as an Object, or null if no attribute of the given name exists.

9 ServletInputStream getInputStream()

Retrieves the body of the request as binary data using a ServletInputStream.

10 String getAuthType()

Returns the name of the authentication scheme used to protect the servlet, for example, “BASIC” or “SSL,” or null if the JSP was not protected

11 String getCharacterEncoding()

Returns the name of the character encoding used in the body of this request.

12 String getContentType()

Returns the MIME type of the body of the request, or null if the type is not known.

13 String getContextPath()

Returns the portion of the request URI that indicates the context of the request.

14 String getHeader(String name)

Returns the value of the specified request header as a String.

15 String getMethod()

Returns the name of the HTTP method with which this request was made, for example, GET, POST, or PUT.

16 String getParameter(String name)

Returns the value of a request parameter as a String, or null if the parameter does not exist.

17 String getPathInfo()

Returns any extra path information associated with the URL the client sent when it made this request.

18 String getProtocol()

Returns the name and version of the protocol the request.

19 String getQueryString()

Returns the query string that is contained in the request URL after the path.

20 String getRemoteAddr()

Returns the Internet Protocol (IP) address of the client that sent the request.

21 String getRemoteHost()

Returns the fully qualified name of the client that sent the request.

22 String getRemoteUser()

Returns the login of the user making this request, if the user has been authenticated, or null if the user has not been authenticated.

23 String getRequestURI()

Returns the part of this request’s URL from the protocol name up to the query string in the first line of the HTTP request.

24 String getRequestedSessionId()

Returns the session ID specified by the client.

25 String getServletPath()

Returns the part of this request’s URL that calls the JSP.

26 String[] getParameterValues(String name)

Returns an array of String objects containing all of the values the given request parameter has, or null if the parameter does not exist.

27 boolean isSecure()

Returns a boolean indicating whether this request was made using a secure channel, such as HTTPS.

28 int getContentLength()

Returns the length, in bytes, of the request body and made available by the input stream, or -1 if the length is not known.

29 int getIntHeader(String name)

Returns the value of the specified request header as an int.

30 int getServerPort()

Returns the port number on which this request was received.

HTTP Header Request Example:

Following is the example which uses getHeaderNames() method of HttpServletRequest to read the HTTP header infromation. This method returns an Enumeration that contains the header information associated with the current HTTP request.

Once we have an Enumeration, we can loop down the Enumeration in the standard manner, using hasMoreElements() method to determine when to stop and using nextElement() method to get each parameter name.

<%@ page import="java.io.*,java.util.*" %>
<html>
<head>
<title>HTTP Header Request Example</title>
</head>
<body>
<center>
<h2>HTTP Header Request Example</h2>
<table width="100%" border="1" align="center">
<tr bgcolor="#949494">
<th>Header Name</th><th>Header Value(s)</th>
</tr>
<%
   Enumeration headerNames = request.getHeaderNames();
   while(headerNames.hasMoreElements()) {
      String paramName = (String)headerNames.nextElement();
      out.print("<tr><td>" + paramName + "</td>\n");
      String paramValue = request.getHeader(paramName);
      out.println("<td> " + paramValue + "</td></tr>\n");
   }
%>
</table>
</center>
</body>
</html>

Now put the above code in main.jsp and try to access it. This would produce result something as follows:

HTTP Header Request Example

Header Name Header Value(s)
accept */*
accept-language en-us
user-agent Mozilla/4.0 (compatible; MSIE 7.0; Windows NT 5.1; Trident/4.0; InfoPath.2; MS-RTC LM 8)
accept-encoding gzip, deflate
host localhost:8080
connection Keep-Alive
cache-control no-cache

To become more comfortable with other methods you can try few more above listed methods in the same fashion.

When a Web server responds to a HTTP request to the browser, the response typically consists of a status line, some response headers, a blank line, and the document. A typical response looks like this:

HTTP/1.1 200 OK
Content-Type: text/html
Header2: ...
...
HeaderN: ...
  (Blank Line)
<!doctype ...>
<html>
<head>...</head>
<body>
...
</body>
</html>

The status line consists of the HTTP version (HTTP/1.1 in the example), a status code (200 in the example), and a very short message corresponding to the status code (OK in the example).

Following is a summary of the most useful HTTP 1.1 response headers which go back to the browser from web server side and you would use them very frequently in web programming:

Header Description
Allow This header specifies the request methods (GET, POST, etc.) that the server supports.
Cache-Control This header specifies the circumstances in which the response document can safely be cached. It can have values public, private or no-cache etc. Public means document is cacheable, Private means document is for a single user and can only be stored in private (nonshared) caches and no-cache means document should never be cached.
Connection This header instructs the browser whether to use persistent in HTTP connections or not. A value of closeinstructs the browser not to use persistent HTTP connections and keep-alive means using persistent connections.
Content-Disposition This header lets you request that the browser ask the user to save the response to disk in a file of the given name.
Content-Encoding This header specifies the way in which the page was encoded during transmission.
Content-Language This header signifies the language in which the document is written. For example en, en-us, ru, etc.
Content-Length This header indicates the number of bytes in the response. This information is needed only if the browser is using a persistent (keep-alive) HTTP connection.
Content-Type This header gives the MIME (Multipurpose Internet Mail Extension) type of the response document.
Expires This header specifies the time at which the content should be considered out-of-date and thus no longer be cached.
Last-Modified This header indicates when the document was last changed. The client can then cache the document and supply a date by an If-Modified-Since request header in later requests.
Location This header should be included with all responses that have a status code in the 300s. This notifies the browser of the document address. The browser automatically reconnects to this location and retrieves the new document.
Refresh This header specifies how soon the browser should ask for an updated page. You can specify time in number of seconds after which a page would be refreshed.
Retry-After This header can be used in conjunction with a 503 (Service Unavailable) response to tell the client how soon it can repeat its request.
Set-Cookie This header specifies a cookie associated with the page.

The HttpServletResponse Object:

The response object is an instance of a javax.servlet.http.HttpServletResponse object. Just as the server creates the request object, it also creates an object to represent the response to the client.

The response object also defines the interfaces that deal with creating new HTTP headers. Through this object the JSP programmer can add new cookies or date stamps, HTTP status codes etc.

There are following methods which can be used to set HTTP response header in your servlet program. These method are available with HttpServletResponseobject which represents server response.

S.N. Method & Description
1 String encodeRedirectURL(String url)

Encodes the specified URL for use in the sendRedirect method or, if encoding is not needed, returns the URL unchanged.

2 String encodeURL(String url)

Encodes the specified URL by including the session ID in it, or, if encoding is not needed, returns the URL unchanged.

3 boolean containsHeader(String name)

Returns a boolean indicating whether the named response header has already been set.

4 boolean isCommitted()

Returns a boolean indicating if the response has been committed.

5 void addCookie(Cookie cookie)

Adds the specified cookie to the response.

6 void addDateHeader(String name, long date)

Adds a response header with the given name and date-value.

7 void addHeader(String name, String value)

Adds a response header with the given name and value.

8 void addIntHeader(String name, int value)

Adds a response header with the given name and integer value.

9 void flushBuffer()

Forces any content in the buffer to be written to the client.

10 void reset()

Clears any data that exists in the buffer as well as the status code and headers.

11 void resetBuffer()

Clears the content of the underlying buffer in the response without clearing headers or status code.

12 void sendError(int sc)

Sends an error response to the client using the specified status code and clearing the buffer.

13 void sendError(int sc, String msg)

Sends an error response to the client using the specified status.

14 void sendRedirect(String location)

Sends a temporary redirect response to the client using the specified redirect location URL.

15 void setBufferSize(int size)

Sets the preferred buffer size for the body of the response.

16 void setCharacterEncoding(String charset)

Sets the character encoding (MIME charset) of the response being sent to the client, for example, to UTF-8.

17 void setContentLength(int len)

Sets the length of the content body in the response In HTTP servlets, this method sets the HTTP Content-Length header.

18 void setContentType(String type)

Sets the content type of the response being sent to the client, if the response has not been committed yet.

19 void setDateHeader(String name, long date)

Sets a response header with the given name and date-value.

20 void setHeader(String name, String value)

Sets a response header with the given name and value.

21 void setIntHeader(String name, int value)

Sets a response header with the given name and integer value.

22 void setLocale(Locale loc)

Sets the locale of the response, if the response has not been committed yet.

23 void setStatus(int sc)

Sets the status code for this response.

HTTP Header Response Example:

Following example would use setIntHeader() method to set Refresh header to simulate a digital clock:

<%@ page import="java.io.*,java.util.*" %>
<html>
<head>
<title>Auto Refresh Header Example</title>
</head>
<body>
<center>
<h2>Auto Refresh Header Example</h2>
<%
   // Set refresh, autoload time as 5 seconds
   response.setIntHeader("Refresh", 5);
   // Get current time
   Calendar calendar = new GregorianCalendar();
   String am_pm;
   int hour = calendar.get(Calendar.HOUR);
   int minute = calendar.get(Calendar.MINUTE);
   int second = calendar.get(Calendar.SECOND);
   if(calendar.get(Calendar.AM_PM) == 0)
      am_pm = "AM";
   else
      am_pm = "PM";
   String CT = hour+":"+ minute +":"+ second +" "+ am_pm;
   out.println("Current Time is: " + CT + "\n");
%>
</center>
</body>
</html>

Now put the above code in main.jsp and try to access it. This would display current system time after every 5 seconds as follows. Just run the JSP and wait to see the result:

Auto Refresh Header Example

Current Time is: 9:44:50 PMTo become more comfortable with other methods you can try few more above listed methods in the same fashion.

JSP SYNTAX

This tutorial will give basic idea on simple syntax (ie. elements) involved with JSP development:

The Scriptlet:

A scriptlet can contain any number of JAVA language statements, variable or method declarations, or expressions that are valid in the page scripting language.

Following is the syntax of Scriptlet:

<% code fragment %>

You can write XML equivalent of the above syntax as follows:

<jsp:scriptlet>
   code fragment
</jsp:scriptlet>

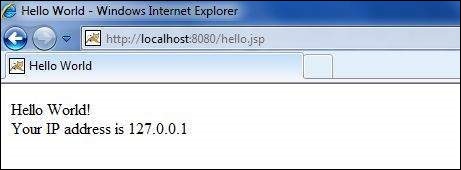
Any text, HTML tags, or JSP elements you write must be outside the scriptlet. Following is the simple and first example for JSP:

<html>
<head><title>Hello World</title></head>
<body>
Hello World!<br/>
<%
out.println("Your IP address is " + request.getRemoteAddr());
%>
</body>
</html>

NOTE: Assuming that Apache Tomcat is installed in C:\apache-tomcat-7.0.2 and your environment is setup as per environment setup tutorial.

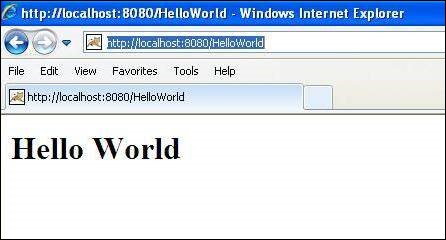
Let us keep above code in JSP file hello.jsp and put this file in C:\apache-tomcat-7.0.2\webapps\ROOT directory and try to browse it by giving URL http://localhost:8080/hello.jsp. This would generate following result:

Hello World

JSP Declarations:

A declaration declares one or more variables or methods that you can use in Java code later in the JSP file. You must declare the variable or method before you use it in the JSP file.

Following is the syntax of JSP Declarations:

<%! declaration; [ declaration; ]+ ... %>

You can write XML equivalent of the above syntax as follows:

<jsp:declaration>
   code fragment
</jsp:declaration>

Following is the simple example for JSP Declarations:

<%! int i = 0; %> 
<%! int a, b, c; %> 
<%! Circle a = new Circle(2.0); %> 

JSP Expression:

A JSP expression element contains a scripting language expression that is evaluated, converted to a String, and inserted where the expression appears in the JSP file.

Because the value of an expression is converted to a String, you can use an expression within a line of text, whether or not it is tagged with HTML, in a JSP file.

The expression element can contain any expression that is valid according to the Java Language Specification but you cannot use a semicolon to end an expression.

Following is the syntax of JSP Expression:

<%= expression %>

You can write XML equivalent of the above syntax as follows:

<jsp:expression>
   expression
</jsp:expression>

Following is the simple example for JSP Expression:

<html> 
<head><title>A Comment Test</title></head> 
<body>
<p>
   Today's date: <%= (new java.util.Date()).toLocaleString()%>
</p>
</body> 
</html>

This would generate following result:

Today’s date: 11-Sep-2010 21:24:25

JSP Comments:

JSP comment marks text or statements that the JSP container should ignore. A JSP comment is useful when you want to hide or “comment out” part of your JSP page.

Following is the syntax of JSP comments:

<%-- This is JSP comment --%>

Following is the simple example for JSP Comments:

<html> 
<head><title>A Comment Test</title></head> 
<body> 
<h2>A Test of Comments</h2> 
<%-- This comment will not be visible in the page source --%> 
</body> 
</html>

This would generate following result:

A Test of Comments

There are a small number of special constructs you can use in various cases to insert comments or characters that would otherwise be treated specially. Here’s a summary:

Syntax Purpose
<%– comment –%> A JSP comment. Ignored by the JSP engine.
<!– comment –> An HTML comment. Ignored by the browser.
<\% Represents static <% literal.
%\> Represents static %> literal.
\’ A single quote in an attribute that uses single quotes.
\” A double quote in an attribute that uses double quotes.

JSP Directives:

A JSP directive affects the overall structure of the servlet class. It usually has the following form:

<%@ directive attribute="value" %>

There are three types of directive tag:

Directive Description
<%@ page … %> Defines page-dependent attributes, such as scripting language, error page, and buffering requirements.
<%@ include … %> Includes a file during the translation phase.
<%@ taglib … %> Declares a tag library, containing custom actions, used in the page

We would explain JSP directive in separate chapter JSP – Directives

JSP Actions:

JSP actions use constructs in XML syntax to control the behavior of the servlet engine. You can dynamically insert a file, reuse JavaBeans components, forward the user to another page, or generate HTML for the Java plugin.

There is only one syntax for the Action element, as it conforms to the XML standard:

<jsp:action_name attribute="value" />

Action elements are basically predefined functions and there are following JSP actions available:

Syntax Purpose
jsp:include Includes a file at the time the page is requested
jsp:useBean Finds or instantiates a JavaBean
jsp:setProperty Sets the property of a JavaBean
jsp:getProperty Inserts the property of a JavaBean into the output
jsp:forward Forwards the requester to a new page
jsp:plugin Generates browser-specific code that makes an OBJECT or EMBED tag for the Java plugin
jsp:element Defines XML elements dynamically.
jsp:attribute Defines dynamically defined XML element’s attribute.
jsp:body Defines dynamically defined XML element’s body.
jsp:text Use to write template text in JSP pages and documents.

We would explain JSP actions in separate chapter JSP – Actions

JSP Implicit Objects:

JSP supports nine automatically defined variables, which are also called implicit objects. These variables are:

Objects Description
request This is the HttpServletRequest object associated with the request.
response This is the HttpServletResponse object associated with the response to the client.
out This is the PrintWriter object used to send output to the client.
session This is the HttpSession object associated with the request.
application This is the ServletContext object associated with application context.
config This is the ServletConfig object associated with the page.
pageContext This encapsulates use of server-specific features like higher performance JspWriters.
page This is simply a synonym for this, and is used to call the methods defined by the translated servlet class.
Exception The Exception object allows the exception data to be accessed by designated JSP.

We would explain JSP Implicit Objects in separate chapter JSP – Implicit Objects.

Control-Flow Statements:

JSP provides full power of Java to be embedded in your web application. You can use all the APIs and building blocks of Java in your JSP programming including decision making statements, loops etc.

Decision-Making Statements:

The if…else block starts out like an ordinary Scriptlet, but the Scriptlet is closed at each line with HTML text included between Scriptlet tags.

<%! int day = 3; %> 
<html> 
<head><title>IF...ELSE Example</title></head> 
<body>
<% if (day == 1 | day == 7) { %>
      <p> Today is weekend</p>
<% } else { %>
      <p> Today is not weekend</p>
<% } %>
</body> 
</html>

This would produce following result:

Today is not weekend

Now look at the following switch…case block which has been written a bit differentlty using out.println() and inside Scriptletas:

<%! int day = 3; %> 
<html> 
<head><title>SWITCH...CASE Example</title></head> 
<body>
<% 
switch(day) {
case 0:
   out.println("It\'s Sunday.");
   break;
case 1:
   out.println("It\'s Monday.");
   break;
case 2:
   out.println("It\'s Tuesday.");
   break;
case 3:
   out.println("It\'s Wednesday.");
   break;
case 4:
   out.println("It\'s Thursday.");
   break;
case 5:
   out.println("It\'s Friday.");
   break;
default:
   out.println("It's Saturday.");
}
%>
</body> 
</html>

This would produce following result:

It’s Wednesday.

Loop Statements:

You can also use three basic types of looping blocks in Java: for, while,and do…while blocks in your JSP programming.

Let us look at the following for loop example:

<%! int fontSize; %> 
<html> 
<head><title>FOR LOOP Example</title></head> 
<body>
<%for ( fontSize = 1; fontSize <= 3; fontSize++){ %>
   <font color="green" size="<%= fontSize %>">
    JSP Tutorial
   </font><br />
<%}%>
</body> 
</html>

This would produce following result:

   
    JSP Tutorial
   
    
    JSP Tutorial
   
    
    JSP Tutorial
   

Above example can be written using while loop as follows:

<%! int fontSize; %> 
<html> 
<head><title>WHILE LOOP Example</title></head> 
<body>
<%while ( fontSize <= 3){ %>
   <font color="green" size="<%= fontSize %>">
    JSP Tutorial
   </font><br />
<%fontSize++;%>
<%}%>
</body> 
</html>

This would also produce following result:

   
    JSP Tutorial
   
    
    JSP Tutorial
   
    
    JSP Tutorial
   

JSP Operators:

JSP supports all the logical and arithmetic operators supported by Java. Following table give a list of all the operators with the highest precedence appear at the top of the table, those with the lowest appear at the bottom.

Within an expression, higher precedence operators will be evaluated first.

Category Operator Associativity
Postfix () [] . (dot operator) Left to right
Unary ++ – – ! ~ Right to left
Multiplicative * / % Left to right
Additive + – Left to right
Shift >> >>> << Left to right
Relational > >= < <= Left to right
Equality == != Left to right
Bitwise AND & Left to right
Bitwise XOR ^ Left to right
Bitwise OR | Left to right
Logical AND && Left to right
Logical OR || Left to right
Conditional ?: Right to left
Assignment = += -= *= /= %= >>= <<= &= ^= |= Right to left
Comma , Left to right

JSP Literals:

The JSP expression language defines the following literals:

  • Boolean: true and false
  • Integer: as in Java
  • Floating point: as in Java
  • String: with single and double quotes; ” is escaped as \”, ‘ is escaped as \’, and \ is escaped as \\.
  • Null: null

JSP directives provide directions and instructions to the container, telling it how to handle certain aspects of JSP processing.

A JSP directive affects the overall structure of the servlet class. It usually has the following form:

<%@ directive attribute="value" %>

Directives can have a number of attributes which you can list down as key-value pairs and separated by commas.

The blanks between the @ symbol and the directive name, and between the last attribute and the closing %>, are optional.

There are three types of directive tag:

Directive Description
<%@ page … %> Defines page-dependent attributes, such as scripting language, error page, and buffering requirements.
<%@ include … %> Includes a file during the translation phase.
<%@ taglib … %> Declares a tag library, containing custom actions, used in the page

The page Directive:

The page directive is used to provide instructions to the container that pertain to the current JSP page. You may code page directives anywhere in your JSP page. By convention, page directives are coded at the top of the JSP page.

Following is the basic syntax of page directive:

<%@ page attribute="value" %>

You can write XML equivalent of the above syntax as follows:

<jsp:directive.page attribute="value" />

Attributes:

Following is the list of attributes associated with page directive:

Attribute Purpose
buffer Specifies a buffering model for the output stream.
autoFlush Controls the behavior of the servlet output buffer.
contentType Defines the character encoding scheme.
errorPage Defines the URL of another JSP that reports on Java unchecked runtime exceptions.
isErrorPage Indicates if this JSP page is a URL specified by another JSP page’s errorPage attribute.
extends Specifies a superclass that the generated servlet must extend
import Specifies a list of packages or classes for use in the JSP as the Java import statement does for Java classes.
info Defines a string that can be accessed with the servlet’s getServletInfo() method.
isThreadSafe Defines the threading model for the generated servlet.
language Defines the programming language used in the JSP page.
session Specifies whether or not the JSP page participates in HTTP sessions
isELIgnored Specifies whether or not EL expression within the JSP page will be ignored.
isScriptingEnabled Determines if scripting elements are allowed for use.

Check more detail related to all the above attributes at Page Directive.

The include Directive:

The include directive is used to includes a file during the translation phase. This directive tells the container to merge the content of other external files with the current JSP during the translation phase. You may code include directives anywhere in your JSP page.

The general usage form of this directive is as follows:

<%@ include file="relative url" >

The filename in the include directive is actually a relative URL. If you just specify a filename with no associated path, the JSP compiler assumes that the file is in the same directory as your JSP.

You can write XML equivalent of the above syntax as follows:

<jsp:directive.include file="relative url" />

Check more detail related to include directive at Include Directive.

The taglib Directive:

The JavaServer Pages API allows you to define custom JSP tags that look like HTML or XML tags and a tag library is a set of user-defined tags that implement custom behavior.

The taglib directive declares that your JSP page uses a set of custom tags, identifies the location of the library, and provides a means for identifying the custom tags in your JSP page.

The taglib directive follows the following syntax:

<%@ taglib uri="uri" prefix="prefixOfTag" >

Where the uri attribute value resolves to a location the container understands and the prefix attribute informs a container what bits of markup are custom actions.

You can write XML equivalent of the above syntax as follows:

<jsp:directive.taglib uri="uri" prefix="prefixOfTag" />

JSP-JAVA SERVER PAGES

What is JavaServer Pages?

JavaServer Pages (JSP) is a technology for developing web pages that support dynamic content which helps developers insert java code in HTML pages by making use of special JSP tags, most of which start with <% and end with %>.

A JavaServer Pages component is a type of Java servlet that is designed to fulfill the role of a user interface for a Java web application. Web developers write JSPs as text files that combine HTML or XHTML code, XML elements, and embedded JSP actions and commands.

Using JSP, you can collect input from users through web page forms, present records from a database or another source, and create web pages dynamically.

JSP tags can be used for a variety of purposes, such as retrieving information from a database or registering user preferences, accessing JavaBeans components, passing control between pages and sharing information between requests, pages etc.

Why Use JSP?

JavaServer Pages often serve the same purpose as programs implemented using the Common Gateway Interface (CGI). But JSP offer several advantages in comparison with the CGI.

  • Performance is significantly better because JSP allows embedding Dynamic Elements in HTML Pages itself instead of having a separate CGI files.
  • JSP are always compiled before it’s processed by the server unlike CGI/Perl which requires the server to load an interpreter and the target script each time the page is requested.
  • JavaServer Pages are built on top of the Java Servlets API, so like Servlets, JSP also has access to all the powerful Enterprise Java APIs, including JDBC, JNDI, EJB, JAXP etc.
  • JSP pages can be used in combination with servlets that handle the business logic, the model supported by Java servlet template engines.

Finally, JSP is an integral part of Java EE, a complete platform for enterprise class applications. This means that JSP can play a part in the simplest applications to the most complex and demanding.

Advantages of JSP:

Following is the list of other advantages of using JSP over other technologies:

  • vs. Active Server Pages (ASP): The advantages of JSP are twofold. First, the dynamic part is written in Java, not Visual Basic or other MS specific language, so it is more powerful and easier to use. Second, it is portable to other operating systems and non-Microsoft Web servers.
  • vs. Pure Servlets: It is more convenient to write (and to modify!) regular HTML than to have plenty of println statements that generate the HTML.
  • vs. Server-Side Includes (SSI): SSI is really only intended for simple inclusions, not for “real” programs that use form data, make database connections, and the like.
  • vs. JavaScript: JavaScript can generate HTML dynamically on the client but can hardly interact with the web server to perform complex tasks like database access and image processing etc.
  • vs. Static HTML: Regular HTML, of course, cannot contain dynamic information.

A development environment is where you would develop your JSP programs, test them and finally run them.

This tutorial will guide you to setup your JSP development environment which involves following steps:

Setting up Java Development Kit

This step involves downloading an implementation of the Java Software Development Kit (SDK) and setting up PATH environment variable appropriately.

You can download SDK from Oracle’s Java site: Java SE Downloads.

Once you download your Java implementation, follow the given instructions to install and configure the setup. Finally set PATH and JAVA_HOME environment variables to refer to the directory that contains java and javac, typically java_install_dir/bin and java_install_dir respectively.

If you are running Windows and installed the SDK in C:\jdk1.5.0_20, you would put the following line in your C:\autoexec.bat file.

set PATH=C:\jdk1.5.0_20\bin;%PATH%
set JAVA_HOME=C:\jdk1.5.0_20

Alternatively, on Windows NT/2000/XP, you could also right-click on My Computer, select Properties, then Advanced, then Environment Variables. Then, you would update the PATH value and press the OK button.

On Unix (Solaris, Linux, etc.), if the SDK is installed in /usr/local/jdk1.5.0_20 and you use the C shell, you would put the following into your .cshrc file.

setenv PATH /usr/local/jdk1.5.0_20/bin:$PATH
setenv JAVA_HOME /usr/local/jdk1.5.0_20

Alternatively, if you use an Integrated Development Environment (IDE) like Borland JBuilder, Eclipse, IntelliJ IDEA, or Sun ONE Studio, compile and run a simple program to confirm that the IDE knows where you installed Java.

Setting up Web Server: Tomcat

A number of Web Servers that support JavaServer Pages and Servlets development are available in the market. Some web servers are freely downloadable and Tomcat is one of them.

Apache Tomcat is an open source software implementation of the JavaServer Pages and Servlet technologies and can act as a standalone server for testing JSP and Servlets and can be integrated with the Apache Web Server. Here are the steps to setup Tomcat on your machine:

  • Download latest version of Tomcat from http://tomcat.apache.org/.
  • Once you downloaded the installation, unpack the binary distribution into a convenient location. For example in C:\apache-tomcat-5.5.29 on windows, or /usr/local/apache-tomcat-5.5.29 on Linux/Unix and create CATALINA_HOME environment variable pointing to these locations.

Tomcat can be started by executing the following commands on windows machine:

 %CATALINA_HOME%\bin\startup.bat
 
 or
 
 C:\apache-tomcat-5.5.29\bin\startup.bat

Tomcat can be started by executing the following commands on Unix (Solaris, Linux, etc.) machine:

$CATALINA_HOME/bin/startup.sh
 
or
 
/usr/local/apache-tomcat-5.5.29/bin/startup.sh

After a successful startup, the default web applications included with Tomcat will be available by visiting http://localhost:8080/. If everything is fine then it should display following result:

Tomcat Home pageFurther information about configuring and running Tomcat can be found in the documentation included here, as well as on the Tomcat web site: http://tomcat.apache.org

Tomcat can be stopped by executing the following commands on windows machine:

%CATALINA_HOME%\bin\shutdown
or

C:\apache-tomcat-5.5.29\bin\shutdown

Tomcat can be stopped by executing the following commands on Unix (Solaris, Linux, etc.) machine:

$CATALINA_HOME/bin/shutdown.sh

or

/usr/local/apache-tomcat-5.5.29/bin/shutdown.sh

Setting up CLASSPATH

Since servlets are not part of the Java Platform, Standard Edition, you must identify the servlet classes to the compiler.

If you are running Windows, you need to put the following lines in your C:\autoexec.bat file.

set CATALINA=C:\apache-tomcat-5.5.29
set CLASSPATH=%CATALINA%\common\lib\jsp-api.jar;%CLASSPATH%

Alternatively, on Windows NT/2000/XP, you could also right-click on My Computer, select Properties, then Advanced, then Environment Variables. Then, you would update the CLASSPATH value and press the OK button.

On Unix (Solaris, Linux, etc.), if you are using the C shell, you would put the following lines into your .cshrc file.

setenv CATALINA=/usr/local/apache-tomcat-5.5.29
setenv CLASSPATH $CATALINA/common/lib/jsp-api.jar:$CLASSPATH

NOTE: Assuming that your development directory is C:\JSPDev (Windows) or /usr/JSPDev (Unix) then you would need to add these directories as well in CLASSPATH in similar way as you have added above.

The web server needs a JSP engine ie. container to process JSP pages. The JSP container is responsible for intercepting requests for JSP pages. This tutorial makes use of Apache which has built-in JSP container to support JSP pages development.

A JSP container works with the Web server to provide the runtime environment and other services a JSP needs. It knows how to understand the special elements that are part of JSPs.

Following diagram shows the position of JSP container and JSP files in a Web Application.

JSP Architecture

JSP Processing:

The following steps explain how the web server creates the web page using JSP:

  • As with a normal page, your browser sends an HTTP request to the web server.
  • The web server recognizes that the HTTP request is for a JSP page and forwards it to a JSP engine. This is done by using the URL or JSP page which ends with .jsp instead of .html.
  • The JSP engine loads the JSP page from disk and converts it into a servlet content. This conversion is very simple in which all template text is converted to println( ) statements and all JSP elements are converted to Java code that implements the corresponding dynamic behavior of the page.
  • The JSP engine compiles the servlet into an executable class and forwards the original request to a servlet engine.
  • A part of the web server called the servlet engine loads the Servlet class and executes it. During execution, the servlet produces an output in HTML format, which the servlet engine passes to the web server inside an HTTP response.
  • The web server forwards the HTTP response to your browser in terms of static HTML content.
  • Finally web browser handles the dynamically generated HTML page inside the HTTP response exactly as if it were a static page.

All the above mentioned steps can be shown below in the following diagram:

JSP Processing
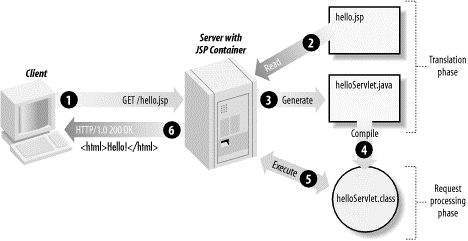
Typically, the JSP engine checks to see whether a servlet for a JSP file already exists and whether the modification date on the JSP is older than the servlet. If the JSP is older than its generated servlet, the JSP container assumes that the JSP hasn’t changed and that the generated servlet still matches the JSP’s contents. This makes the process more efficient than with other scripting languages (such as PHP) and therefore faster.

So in a way, a JSP page is really just another way to write a servlet without having to be a Java programming wiz. Except for the translation phase, a JSP page is handled exactly like a regular servlet

The key to understanding the low-level functionality of JSP is to understand the simple life cycle they follow.

A JSP life cycle can be defined as the entire process from its creation till the destruction which is similar to a servlet life cycle with an additional step which is required to compile a JSP into servlet.

The following are the paths followed by a JSP

  • Compilation
  • Initialization
  • Execution
  • Cleanup

The four major phases of JSP life cycle are very similar to Servlet Life Cycle and they are as follows:

JSP Life Cycle

JSP Compilation:

When a browser asks for a JSP, the JSP engine first checks to see whether it needs to compile the page. If the page has never been compiled, or if the JSP has been modified since it was last compiled, the JSP engine compiles the page.

The compilation process involves three steps:

  • Parsing the JSP.
  • Turning the JSP into a servlet.
  • Compiling the servlet.

JSP Initialization:

When a container loads a JSP it invokes the jspInit() method before servicing any requests. If you need to perform JSP-specific initialization, override the jspInit() method:

public void jspInit(){
  // Initialization code...
}

Typically initialization is performed only once and as with the servlet init method, you generally initialize database connections, open files, and create lookup tables in the jspInit method.

JSP Execution:

This phase of the JSP life cycle represents all interactions with requests until the JSP is destroyed.

Whenever a browser requests a JSP and the page has been loaded and initialized, the JSP engine invokes the _jspService() method in the JSP.

The _jspService() method takes an HttpServletRequest and anHttpServletResponse as its parameters as follows:

void _jspService(HttpServletRequest request, 
                 HttpServletResponse response)
{
   // Service handling code...
}

The _jspService() method of a JSP is invoked once per a request and is responsible for generating the response for that request and this method is also responsible for generating responses to all seven of the HTTP methods ie. GET, POST, DELETE etc.

JSP Cleanup:

The destruction phase of the JSP life cycle represents when a JSP is being removed from use by a container.

The jspDestroy() method is the JSP equivalent of the destroy method for servlets. Override jspDestroy when you need to perform any cleanup, such as releasing database connections or closing open files.

The jspDestroy() method has the following form:

public void jspDestroy()
{
   // Your cleanup code goes here.
}

PAGE REDIRECT

Page redirection is generally used when a document moves to a new location and we need to send the client to this new location or may be because of load balancing, or for simple randomization.

The simplest way of redirecting a request to another page is using methodsendRedirect() of response object. Following is the signature of this method:

public void HttpServletResponse.sendRedirect(String location)
throws IOException

This method sends back the response to the browser along with the status code and new page location. You can also use setStatus() and setHeader() methods together to achieve the same:

....
String site = "http://www.newpage.com" ;
response.setStatus(response.SC_MOVED_TEMPORARILY);
response.setHeader("Location", site); 
....

Example:

This example shows how a servlet performs page redirection to another location:

import java.io.*;
import java.sql.Date;
import java.util.*;
import javax.servlet.*;
import javax.servlet.http.*;

public class PageRedirect extends HttpServlet{
    
  public void doGet(HttpServletRequest request,
                    HttpServletResponse response)
            throws ServletException, IOException
  {
      // Set response content type
      response.setContentType("text/html");

      // New location to be redirected
      String site = new String("http://www.photofuntoos.com");

      response.setStatus(response.SC_MOVED_TEMPORARILY);
      response.setHeader("Location", site);    
    }
}

Now let us compile above servlet and create following entries in web.xml

....
 <servlet>
     <servlet-name>PageRedirect</servlet-name>
     <servlet-class>PageRedirect</servlet-class>
 </servlet>

 <servlet-mapping>
     <servlet-name>PageRedirect</servlet-name>
     <url-pattern>/PageRedirect</url-pattern>
 </servlet-mapping>
....

Now call this servlet using URL http://localhost:8080/PageRedirect. This would take you given URL http://www.photofuntoos.com.

SERVLET SESSIONS

HTTP is a “stateless” protocol which means each time a client retrieves a Web page, the client opens a separate connection to the Web server and the server automatically does not keep any record of previous client request.

Still there are following three ways to maintain session between web client and web server:

Cookies:

A webserver can assign a unique session ID as a cookie to each web client and for subsequent requests from the client they can be recognized using the recieved cookie.

This may not be an effective way because many time browser does not support a cookie, so I would not recommend to use this procedure to maintain the sessions.

Hidden Form Fields:

A web server can send a hidden HTML form field along with a unique session ID as follows:

<input type="hidden" name="sessionid" value="12345">

This entry means that, when the form is submitted, the specified name and value are automatically included in the GET or POST data. Each time when web browser sends request back, then session_id value can be used to keep the track of different web browsers.

This could be an effective way of keeping track of the session but clicking on a regular (<A HREF…>) hypertext link does not result in a form submission, so hidden form fields also cannot support general session tracking.

URL Rewriting:

You can append some extra data on the end of each URL that identifies the session, and the server can associate that session identifier with data it has stored about that session.

For example, with http://tutorialspoint.com/file.htm;sessionid=12345, the session identifier is attached as sessionid=12345 which can be accessed at the web server to identify the client.

URL rewriting is a better way to maintain sessions and works for the browsers when they don’t support cookies but here drawback is that you would have generate every URL dynamically to assign a session ID though page is simple static HTML page.

The HttpSession Object:

Apart from the above mentioned three ways, servlet provides HttpSession Interface which provides a way to identify a user across more than one page request or visit to a Web site and to store information about that user.

The servlet container uses this interface to create a session between an HTTP client and an HTTP server. The session persists for a specified time period, across more than one connection or page request from the user.

You would get HttpSession object by calling the public method getSession() of HttpServletRequest, as below:

HttpSession session = request.getSession();

You need to call request.getSession() before you send any document content to the client. Here is a summary of the important methods available through HttpSession object:

S.N. Method & Description
1 public Object getAttribute(String name)

This method returns the object bound with the specified name in this session, or null if no object is bound under the name.

2 public Enumeration getAttributeNames()

This method returns an Enumeration of String objects containing the names of all the objects bound to this session.

3 public long getCreationTime()

This method returns the time when this session was created, measured in milliseconds since midnight January 1, 1970 GMT.

4 public String getId()

This method returns a string containing the unique identifier assigned to this session.

5 public long getLastAccessedTime()

This method returns the last time the client sent a request associated with this session, as the number of milliseconds since midnight January 1, 1970 GMT.

6 public int getMaxInactiveInterval()

This method returns the maximum time interval, in seconds, that the servlet container will keep this session open between client accesses.

7 public void invalidate()

This method invalidates this session and unbinds any objects bound to it.

8 public boolean isNew(

This method returns true if the client does not yet know about the session or if the client chooses not to join the session.

9 public void removeAttribute(String name)

This method removes the object bound with the specified name from this session.

10 public void setAttribute(String name, Object value)

This method binds an object to this session, using the name specified.

11 public void setMaxInactiveInterval(int interval)

This method specifies the time, in seconds, between client requests before the servlet container will invalidate this session.

Session Tracking Example:

This example describes how to use the HttpSession object to find out the creation time and the last-accessed time for a session. We would associate a new session with the request if one does not already exist.

// Import required java libraries
import java.io.*;
import javax.servlet.*;
import javax.servlet.http.*;
import java.util.*;
 
// Extend HttpServlet class
public class SessionTrack extends HttpServlet {
 
  public void doGet(HttpServletRequest request,
                    HttpServletResponse response)
            throws ServletException, IOException
  {
      // Create a session object if it is already not  created.
      HttpSession session = request.getSession(true);
      // Get session creation time.
      Date createTime = new Date(session.getCreationTime());
      // Get last access time of this web page.
      Date lastAccessTime = 
                        new Date(session.getLastAccessedTime());

      String title = "Welcome Back to my website";
      Integer visitCount = new Integer(0);
      String visitCountKey = new String("visitCount");
      String userIDKey = new String("userID");
      String userID = new String("ABCD");

      // Check if this is new comer on your web page.
      if (session.isNew()){
         title = "Welcome to my website";
         session.setAttribute(userIDKey, userID);
      } else {
         visitCount = (Integer)session.getAttribute(visitCountKey);
         visitCount = visitCount + 1;
         userID = (String)session.getAttribute(userIDKey);
      }
      session.setAttribute(visitCountKey,  visitCount);

      // Set response content type
      response.setContentType("text/html");
      PrintWriter out = response.getWriter();

      String docType =
      "<!doctype html public \"-//w3c//dtd html 4.0 " +
      "transitional//en\">\n";
      out.println(docType +
                "<html>\n" +
                "<head><title>" + title + "</title></head>\n" +
                "<body bgcolor=\"#f0f0f0\">\n" +
                "<h1 align=\"center\">" + title + "</h1>\n" +
                 "<h2 align=\"center\">Session Infomation</h2>\n" +
                "<table border=\"1\" align=\"center\">\n" +
                "<tr bgcolor=\"#949494\">\n" +
                "  <th>Session info</th><th>value</th></tr>\n" +
                "<tr>\n" +
                "  <td>id</td>\n" +
                "  <td>" + session.getId() + "</td></tr>\n" +
                "<tr>\n" +
                "  <td>Creation Time</td>\n" +
                "  <td>" + createTime + 
                "  </td></tr>\n" +
                "<tr>\n" +
                "  <td>Time of Last Access</td>\n" +
                "  <td>" + lastAccessTime + 
                "  </td></tr>\n" +
                "<tr>\n" +
                "  <td>User ID</td>\n" +
                "  <td>" + userID + 
                "  </td></tr>\n" +
                "<tr>\n" +
                "  <td>Number of visits</td>\n" +
                "  <td>" + visitCount + "</td></tr>\n" +
                "</table>\n" +
                "</body></html>");
  }
}

Compile above servlet SessionTrack and create appropriate entry in web.xml file. Now running http://localhost:8080/SessionTrack would display the following result when you would run for the first time:

Welcome to my website

Session Infomation

Session info value
id 0AE3EC93FF44E3C525B4351B77ABB2D5
Creation Time Tue Jun 08 17:26:40 GMT+04:00 2010
Time of Last Access Tue Jun 08 17:26:40 GMT+04:00 2010
User ID ABCD
Number of visits 0

Now try to run the same servlet for second time, it would display following result.

Welcome Back to my website

Session Infomation

info type value
id 0AE3EC93FF44E3C525B4351B77ABB2D5
Creation Time Tue Jun 08 17:26:40 GMT+04:00 2010
Time of Last Access Tue Jun 08 17:26:40 GMT+04:00 2010
User ID ABCD
Number of visits 1

Deleting Session Data:

When you are done with a user’s session data, you have several options:

  • Remove a particular attribute: You can call public void removeAttribute(String name) method to delete the value associated with a particular key.
  • Delete the whole session: You can call public void invalidate()method to discard an entire session.
  • Setting Session timeout: You can call public void setMaxInactiveInterval(int interval) method to set the timeout for a session individually.
  • Log the user out: The servers that support servlets 2.4, you can calllogout to log the client out of the Web server and invalidate all sessions belonging to all the users.
  • web.xml Configuration: If you are using Tomcat, apart from the above mentioned methods, you can configure session time out in web.xml file as follows.
  <session-config>
    <session-timeout>15</session-timeout>
  </session-config>

The timeout is expressed as minutes, and overrides the default timeout which is 30 minutes in Tomcat.

The getMaxInactiveInterval( ) method in a servlet returns the timeout period for that session in seconds. So if your session is configured in web.xml for 15 minutes, getMaxInactiveInterval( ) returns 900.

ECXEPTIONS

When a servlet throws an exception, the web container searches the configurations in web.xml that use the exception-type element for a match with the thrown exception type.

You would have to use the error-page element in web.xml to specify the invocation of servlets in response to certain exceptions or HTTP status codes.

web.xml Configuration:

Consider, you have an ErrorHandler servlet which would be called whenever there is any defined exception or error. Following would be the entry created in web.xml.

<!-- servlet definition -->
<servlet>
        <servlet-name>ErrorHandler</servlet-name>
        <servlet-class>ErrorHandler</servlet-class>
</servlet>
<!-- servlet mappings -->
<servlet-mapping>
        <servlet-name>ErrorHandler</servlet-name>
        <url-pattern>/ErrorHandler</url-pattern>
</servlet-mapping>

<!-- error-code related error pages -->
<error-page>
    <error-code>404</error-code>
    <location>/ErrorHandler</location>
</error-page>
<error-page>
    <error-code>403</error-code>
    <location>/ErrorHandler</location>
</error-page>

<!-- exception-type related error pages -->
<error-page>
    <exception-type>
          javax.servlet.ServletException
    </exception-type >
    <location>/ErrorHandler</location>
</error-page>

<error-page>
    <exception-type>java.io.IOException</exception-type >
    <location>/ErrorHandler</location>
</error-page>

If you want to have a generic Error Handler for all the exceptions then you should define following error-page instead of defining separate error-page elements for every exception:

<error-page>
    <exception-type>java.lang.Throwable</exception-type >
    <location>/ErrorHandler</location>
</error-page>

Following are the points to be noted about above web.xml for Exception Handling:

  • The servlet ErrorHandler is defined in usual way as any other servlet and configured in web.xml.
  • If there is any error with status code either 404 ( Not Found) or 403 ( Forbidden ), then ErrorHandler servlet would be called.
  • If the web application throws either ServletException or IOException, then the web container invokes the /ErrorHandler servlet.
  • You can define different Error Handlers to handle different type of errors or exceptions. Above example is very much generic and hope it serve the purpose to explain you the basic concept.

Request Attributes – Errors/Exceptions:

Following is the list of request attributes that an error-handling servlet can access to analyse the nature of error/exception.

S.N. Attribute & Description
1 javax.servlet.error.status_code

This attribute give status code which can be stored and analysed after storing in a java.lang.Integer data type.

2 javax.servlet.error.exception_type

This attribute gives information about exception type which can be stored and analysed after storing in a java.lang.Class data type.

3 javax.servlet.error.message

This attribute gives information exact error message which can be stored and analysed after storing in a java.lang.String data type.

4 javax.servlet.error.request_uri

This attribute gives information about URL calling the servlet and it can be stored and analysed after storing in a java.lang.String data type.

5 javax.servlet.error.exception

This attribute gives information the exception raised which can be stored and analysed after storing in a java.lang.Throwable data type.

6 javax.servlet.error.servlet_name

This attribute gives servlet name which can be stored and analysed after storing in a java.lang.String data type.

Error Handler Servlet Example:

Following is the Servlet Example that would be used as Error Handler in case of any error or exception occurs with your any of the servlet defined.

This example would give you basic understanding of Exception Handling in Servlet, but you can write more sophisticated filter applications using the same concept:

// Import required java libraries
import java.io.*;
import javax.servlet.*;
import javax.servlet.http.*;
import java.util.*;

// Extend HttpServlet class
public class ErrorHandler extends HttpServlet {
 
  // Method to handle GET method request.
  public void doGet(HttpServletRequest request,
                    HttpServletResponse response)
            throws ServletException, IOException
  {
      // Analyze the servlet exception       
      Throwable throwable = (Throwable)
      request.getAttribute("javax.servlet.error.exception");
      Integer statusCode = (Integer)
      request.getAttribute("javax.servlet.error.status_code");
      String servletName = (String)
      request.getAttribute("javax.servlet.error.servlet_name");
      if (servletName == null){
         servletName = "Unknown";
      }
      String requestUri = (String)
      request.getAttribute("javax.servlet.error.request_uri");
      if (requestUri == null){
         requestUri = "Unknown";
      }

      // Set response content type
      response.setContentType("text/html");
 
      PrintWriter out = response.getWriter();
	  String title = "Error/Exception Information";
      String docType =
      "<!doctype html public \"-//w3c//dtd html 4.0 " +
      "transitional//en\">\n";
      out.println(docType +
        "<html>\n" +
        "<head><title>" + title + "</title></head>\n" +
        "<body bgcolor=\"#f0f0f0\">\n");

      if (throwable == null && statusCode == null){
         out.println("<h2>Error information is missing</h2>");
         out.println("Please return to the <a href=\"" + 
           response.encodeURL("http://localhost:8080/") + 
           "\">Home Page</a>.");
      }else if (statusCode != null){
         out.println("The status code : " + statusCode);
      }else{
         out.println("<h2>Error information</h2>");
         out.println("Servlet Name : " + servletName + 
                             "</br></br>");
         out.println("Exception Type : " + 
                             throwable.getClass( ).getName( ) + 
                             "</br></br>");
         out.println("The request URI: " + requestUri + 
                             "<br><br>");
         out.println("The exception message: " + 
                                 throwable.getMessage( ));
      }
      out.println("</body>");
      out.println("</html>");
  }
  // Method to handle POST method request.
  public void doPost(HttpServletRequest request,
                     HttpServletResponse response)
      throws ServletException, IOException {
     doGet(request, response);
  }
}

Compile ErrorHandler.java in usual way and put your class file in <Tomcat-installation-directory>/webapps/ROOT/WEB-INF/classes.

Let us add the following configuration in web.xml to handle exceptions:

<servlet>
        <servlet-name>ErrorHandler</servlet-name>
        <servlet-class>ErrorHandler</servlet-class>
</servlet>
<!-- servlet mappings -->
<servlet-mapping>
        <servlet-name>ErrorHandler</servlet-name>
        <url-pattern>/ErrorHandler</url-pattern>
</servlet-mapping>
<error-page>
    <error-code>404</error-code>
    <location>/ErrorHandler</location>
</error-page>
<error-page>
    <exception-type>java.lang.Throwable</exception-type >
    <location>/ErrorHandler</location>
</error-page>

Now try to use a servlet which raise any exception or type a wrong URL, this would trigger Web Container to call ErrorHandler servlet and display an appropriate message as programmed. For example, if you type a wrong URL then it would display the following result:

The status code : 404

Above code may not work with some web browsers. So try with Mozilla and Safari and it should work.

Servlet Filters

Servlet Filters are Java classes that can be used in Servlet Programming for the following purposes:

  • To intercept requests from a client before they access a resource at back end.
  • To manipulate responses from server before they are sent back to the client.

There are are various types of filters suggested by the specifications:

  • Authentication Filters.
  • Data compression Filters.
  • Encryption Filters.
  • Filters that trigger resource access events.
  • Image Conversion Filters.
  • Logging and Auditing Filters.
  • MIME-TYPE Chain Filters.
  • Tokenizing Filters .
  • XSL/T Filters That Transform XML Content.

Filters are deployed in the deployment descriptor file web.xml and then map to either servlet names or URL patterns in your application’s deployment descriptor.

When the web container starts up your web application, it creates an instance of each filter that you have declared in the deployment descriptor. The filters execute in the order that they are declared in the deployment descriptor.

Servlet Filter Methods:

A filter is simply a Java class that implements the javax.servlet.Filter interface. The javax.servlet.Filter interface defines three methods:

S.N. Method & Description
1 public void doFilter (ServletRequest, ServletResponse, FilterChain)

This method is called by the container each time a request/response pair is passed through the chain due to a client request for a resource at the end of the chain.

2 public void init(FilterConfig filterConfig)

This method is called by the web container to indicate to a filter that it is being placed into service.

3 public void destroy()

This method is called by the web container to indicate to a filter that it is being taken out of service.

Servlet Filter Example:

Following is the Servlet Filter Example that would print the clients IP address and current date time. This example would give you basic understanding of Servlet Filter, but you can write more sophisticated filter applications using the same concept:

// Import required java libraries
import java.io.*;
import javax.servlet.*;
import javax.servlet.http.*;
import java.util.*;

// Implements Filter class
public class LogFilter implements Filter  {
   public void  init(FilterConfig config) 
                         throws ServletException{
      // Get init parameter 
      String testParam = config.getInitParameter("test-param"); 

      //Print the init parameter 
      System.out.println("Test Param: " + testParam); 
   }
   public void  doFilter(ServletRequest request, 
                 ServletResponse response,
                 FilterChain chain) 
                 throws java.io.IOException, ServletException {

      // Get the IP address of client machine.   
      String ipAddress = request.getRemoteAddr();

      // Log the IP address and current timestamp.
      System.out.println("IP "+ ipAddress + ", Time "
                                       + new Date().toString());

      // Pass request back down the filter chain
      chain.doFilter(request,response);
   }
   public void destroy( ){
      /* Called before the Filter instance is removed 
      from service by the web container*/
   }
}

Compile LogFilter.java in usual way and put your class file in <Tomcat-installation-directory>/webapps/ROOT/WEB-INF/classes.

Servlet Filter Mapping in Web.xml:

Filters are defined and then mapped to a URL or Servlet, in much the same way as Servlet is defined and then mapped to a URL pattern. Create the following entry for filter tag in the deployment descriptor file web.xml

<filter>
   <filter-name>LogFilter</filter-name>
   <filter-class>LogFilter</filter-class>
   <init-param>
	  <param-name>test-param</param-name>
	  <param-value>Initialization Paramter</param-value>
   </init-param>
</filter>
<filter-mapping>
   <filter-name>LogFilter</filter-name>
   <url-pattern>/*</url-pattern>
</filter-mapping>

The above filter would apply to all the servlets because we specified /* in our configuration. You can specify a particular servlet path if you want to apply filter on few servlets only.

Now try to call any servlet in usual way and you would see generated log in your web server log. You can use Log4J logger to log above log in a separate file.

Using Multiple Filters:

Your web application may define several different filters with a specific purpose. Consider, you define two filters AuthenFilter and LogFilter. Rest of the process would remain as explained above except you need to create a different mapping as mentioned below:

<filter>
   <filter-name>LogFilter</filter-name>
   <filter-class>LogFilter</filter-class>
   <init-param>
	  <param-name>test-param</param-name>
	  <param-value>Initialization Paramter</param-value>
   </init-param>
</filter>

<filter>
   <filter-name>AuthenFilter</filter-name>
   <filter-class>AuthenFilter</filter-class>
   <init-param>
	  <param-name>test-param</param-name>
	  <param-value>Initialization Paramter</param-value>
   </init-param>
</filter>

<filter-mapping>
   <filter-name>LogFilter</filter-name>
   <url-pattern>/*</url-pattern>
</filter-mapping>

<filter-mapping>
   <filter-name>AuthenFilter</filter-name>
   <url-pattern>/*</url-pattern>
</filter-mapping>

Filters Application Order:

The order of filter-mapping elements in web.xml determines the order in which the web container applies the filter to the servlet. To reverse the order of the filter, you just need to reverse the filter-mapping elements in the web.xml file.

For example, above example would apply LogFilter first and then it would apply AuthenFilter to any servlet but the following example would reverse the order:

<filter-mapping>
   <filter-name>AuthenFilter</filter-name>
   <url-pattern>/*</url-pattern>
</filter-mapping>

<filter-mapping>
   <filter-name>LogFilter</filter-name>
   <url-pattern>/*</url-pattern>
</filter-mapping>

HTTP CODES

The format of the HTTP request and HTTP response messages are similar and will have following structure:

  • An initial status line + CRLF ( Carriage Return + Line Feed ie. New Line )
  • Zero or more header lines + CRLF
  • A blank line ie. a CRLF
  • An optioanl message body like file, query data or query output.

For example, a server response header looks as follows:

HTTP/1.1 200 OK
Content-Type: text/html
Header2: ...
...
HeaderN: ...
  (Blank Line)
<!doctype ...>
<html>
<head>...</head>
<body>
...
</body>
</html>

The status line consists of the HTTP version (HTTP/1.1 in the example), a status code (200 in the example), and a very short message corresponding to the status code (OK in the example).

Following is a list of HTTP status codes and associated messages that might be returned from the Web Server:

Code: Message: Description:
100 Continue Only a part of the request has been received by the server, but as long as it has not been rejected, the client should continue with the request
101 Switching Protocols The server switches protocol.
200 OK The request is OK
201 Created The request is complete, and a new resource is created
202 Accepted The request is accepted for processing, but the processing is not complete.
203 Non-authoritative Information
204 No Content
205 Reset Content
206 Partial Content
300 Multiple Choices A link list. The user can select a link and go to that location. Maximum five addresses
301 Moved Permanently The requested page has moved to a new url
302 Found The requested page has moved temporarily to a new url
303 See Other The requested page can be found under a different url
304 Not Modified
305 Use Proxy
306 Unused This code was used in a previous version. It is no longer used, but the code is reserved.
307 Temporary Redirect The requested page has moved temporarily to a new url.
400 Bad Request The server did not understand the request
401 Unauthorized The requested page needs a username and a password
402 Payment Required You can not use this code yet
403 Forbidden Access is forbidden to the requested page
404 Not Found The server can not find the requested page.
405 Method Not Allowed The method specified in the request is not allowed.
406 Not Acceptable The server can only generate a response that is not accepted by the client.
407 Proxy Authentication Required You must authenticate with a proxy server before this request can be served.
408 Request Timeout The request took longer than the server was prepared to wait.
409 Conflict The request could not be completed because of a conflict.
410 Gone The requested page is no longer available.
411 Length Required The “Content-Length” is not defined. The server will not accept the request without it.
412 Precondition Failed The precondition given in the request evaluated to false by the server.
413 Request Entity Too Large The server will not accept the request, because the request entity is too large.
414 Request-url Too Long The server will not accept the request, because the url is too long. Occurs when you convert a “post” request to a “get” request with a long query information.
415 Unsupported Media Type The server will not accept the request, because the media type is not supported.
417 Expectation Failed
500 Internal Server Error The request was not completed. The server met an unexpected condition
501 Not Implemented The request was not completed. The server did not support the functionality required.
502 Bad Gateway The request was not completed. The server received an invalid response from the upstream server
503 Service Unavailable The request was not completed. The server is temporarily overloading or down.
504 Gateway Timeout The gateway has timed out.
505 HTTP Version Not Supported The server does not support the “http protocol” version.

Methods to Set HTTP Status Code:

There are following methods which can be used to set HTTP Status Code in your servlet program. These methods are available with HttpServletResponse object.

S.N. Method & Description
1 public void setStatus ( int statusCode )

This method sets an arbitrary status code. The setStatus method takes an int (the status code) as an argument. If your response includes a special status code and a document, be sure to call setStatus before actually returning any of the content with thePrintWriter.

2 public void sendRedirect(String url)

This method generates a 302 response along with a Location header giving the URL of the new document.

3 public void sendError(int code, String message)

This method sends a status code (usually 404) along with a short message that is automatically formatted inside an HTML document and sent to the client.

HTTP Status Code Example:

Following is the example which would send 407 error code to the client browser and browser would show you “Need authentication!!!” message.

// Import required java libraries
import java.io.*;
import javax.servlet.*;
import javax.servlet.http.*;
import java.util.*;

// Extend HttpServlet class
public class showError extends HttpServlet {
 
  // Method to handle GET method request.
  public void doGet(HttpServletRequest request,
                    HttpServletResponse response)
            throws ServletException, IOException
  {
      // Set error code and reason.
      response.sendError(407, "Need authentication!!!" );
  }
  // Method to handle POST method request.
  public void doPost(HttpServletRequest request,
                     HttpServletResponse response)
      throws ServletException, IOException {
     doGet(request, response);
  }
}

Now calling the above servlet would display following result:

HTTP Status 407 – Need authentication!!!

type Status report

messageNeed authentication!!!

descriptionThe client must first authenticate itself with the proxy (Need authentication!!!).

Apache Tomcat/5.5.29

httpstatuses.com is an easy to reference database of HTTP Status Codes with their definitions and helpful code references all in one place. Visit an individual status code via httpstatuses.com/code or browse the list below.

REQUEST-RESPONSE

When a browser requests for a web page, it sends lot of information to the web server which can not be read directly because this information travel as a part of header of HTTP request. You can check HTTP Protocol for more information on this.

Following is the important header information which comes from browser side and you would use very frequently in web programming:

Header Description
Accept This header specifies the MIME types that the browser or other clients can handle. Values of image/png orimage/jpeg are the two most common possibilities.
Accept-Charset This header specifies the character sets the browser can use to display the information. For example ISO-8859-1.
Accept-Encoding This header specifies the types of encodings that the browser knows how to handle. Values of gzip orcompress are the two most common possibilities.
Accept-Language This header specifies the client’s preferred languages in case the servlet can produce results in more than one language. For example en, en-us, ru, etc.
Authorization This header is used by clients to identify themselves when accessing password-protected Web pages.
Connection This header indicates whether the client can handle persistent HTTP connections. Persistent connections permit the client or other browser to retrieve multiple files with a single request. A value of Keep-Alive means that persistent connections should be used
Content-Length This header is applicable only to POST requests and gives the size of the POST data in bytes.
Cookie This header returns cookies to servers that previously sent them to the browser.
Host This header specifies the host and port as given in the original URL.
If-Modified-Since This header indicates that the client wants the page only if it has been changed after the specified date. The server sends a code, 304 which means Not Modifiedheader if no newer result is available.
If-Unmodified-Since This header is the reverse of If-Modified-Since; it specifies that the operation should succeed only if the document is older than the specified date.
Referer This header indicates the URL of the referring Web page. For example, if you are at Web page 1 and click on a link to Web page 2, the URL of Web page 1 is included in the Referer header when the browser requests Web page 2.
User-Agent This header identifies the browser or other client making the request and can be used to return different content to different types of browsers.

Methods to read HTTP Header:

There are following methods which can be used to read HTTP header in your servlet program. These methods are available with HttpServletRequest object.

S.N. Method & Description
1 Cookie[] getCookies()

Returns an array containing all of the Cookie objects the client sent with this request.

2 Enumeration getAttributeNames()

Returns an Enumeration containing the names of the attributes available to this request.

3 Enumeration getHeaderNames()

Returns an enumeration of all the header names this request contains.

4 Enumeration getParameterNames()

Returns an Enumeration of String objects containing the names of the parameters contained in this request.

5 HttpSession getSession()

Returns the current session associated with this request, or if the request does not have a session, creates one.

6 HttpSession getSession(boolean create)

Returns the current HttpSession associated with this request or, if if there is no current session and create is true, returns a new session.

7 Locale getLocale()

Returns the preferred Locale that the client will accept content in, based on the Accept-Language header.

8 Object getAttribute(String name)

Returns the value of the named attribute as an Object, or null if no attribute of the given name exists.

9 ServletInputStream getInputStream()

Retrieves the body of the request as binary data using a ServletInputStream.

10 String getAuthType()

Returns the name of the authentication scheme used to protect the servlet, for example, “BASIC” or “SSL,” or null if the JSP was not protected.

11 String getCharacterEncoding()

Returns the name of the character encoding used in the body of this request.

12 String getContentType()

Returns the MIME type of the body of the request, or null if the type is not known.

13 String getContextPath()

Returns the portion of the request URI that indicates the context of the request.

14 String getHeader(String name)

Returns the value of the specified request header as a String.

15 String getMethod()

Returns the name of the HTTP method with which this request was made, for example, GET, POST, or PUT.

16 String getParameter(String name)

Returns the value of a request parameter as a String, or null if the parameter does not exist.

17 String getPathInfo()

Returns any extra path information associated with the URL the client sent when it made this request.

18 String getProtocol()

Returns the name and version of the protocol the request.

19 String getQueryString()

Returns the query string that is contained in the request URL after the path.

20 String getRemoteAddr()

Returns the Internet Protocol (IP) address of the client that sent the request.

21 String getRemoteHost()

Returns the fully qualified name of the client that sent the request.

22 String getRemoteUser()

Returns the login of the user making this request, if the user has been authenticated, or null if the user has not been authenticated.

23 String getRequestURI()

Returns the part of this request’s URL from the protocol name up to the query string in the first line of the HTTP request.

24 String getRequestedSessionId()

Returns the session ID specified by the client.

25 String getServletPath()

Returns the part of this request’s URL that calls the JSP.

26 String[] getParameterValues(String name)

Returns an array of String objects containing all of the values the given request parameter has, or null if the parameter does not exist.

27 boolean isSecure()

Returns a boolean indicating whether this request was made using a secure channel, such as HTTPS.

28 int getContentLength()

Returns the length, in bytes, of the request body and made available by the input stream, or -1 if the length is not known.

29 int getIntHeader(String name)

Returns the value of the specified request header as an int.

30 int getServerPort()

Returns the port number on which this request was received.

HTTP Header Request Example:

Following is the example which uses getHeaderNames() method of HttpServletRequest to read the HTTP header infromation. This method returns an Enumeration that contains the header information associated with the current HTTP request.

Once we have an Enumeration, we can loop down the Enumeration in the standard manner, using hasMoreElements() method to determine when to stop and using nextElement() method to get each parameter name.

// Import required java libraries
import java.io.*;
import javax.servlet.*;
import javax.servlet.http.*;
import java.util.*;
 
// Extend HttpServlet class
public class DisplayHeader extends HttpServlet {
 
  // Method to handle GET method request.
  public void doGet(HttpServletRequest request,
                    HttpServletResponse response)
            throws ServletException, IOException
  {
      // Set response content type
      response.setContentType("text/html");
 
      PrintWriter out = response.getWriter();
	  String title = "HTTP Header Request Example";
      String docType =
      "<!doctype html public \"-//w3c//dtd html 4.0 " +
      "transitional//en\">\n";
      out.println(docType +
        "<html>\n" +
        "<head><title>" + title + "</title></head>\n"+
        "<body bgcolor=\"#f0f0f0\">\n" +
        "<h1 align=\"center\">" + title + "</h1>\n" +
        "<table width=\"100%\" border=\"1\" align=\"center\">\n" +
        "<tr bgcolor=\"#949494\">\n" +
        "<th>Header Name</th><th>Header Value(s)</th>\n"+
        "</tr>\n");
 
      Enumeration headerNames = request.getHeaderNames();
      
      while(headerNames.hasMoreElements()) {
         String paramName = (String)headerNames.nextElement();
         out.print("<tr><td>" + paramName + "</td>\n");
         String paramValue = request.getHeader(paramName);
         out.println("<td> " + paramValue + "</td></tr>\n");
      }
      out.println("</table>\n</body></html>");
  }
  // Method to handle POST method request.
  public void doPost(HttpServletRequest request,
                     HttpServletResponse response)
      throws ServletException, IOException {
     doGet(request, response);
  }
}

Now calling the above servlet would generate following result:

HTTP Header Request Example

Header Name Header Value(s)
accept */*
accept-language en-us
user-agent Mozilla/4.0 (compatible; MSIE 7.0; Windows NT 5.1; Trident/4.0; InfoPath.2; MS-RTC LM 8)
accept-encoding gzip, deflate
host localhost:8080
connection Keep-Alive
cache-control no-cache

As discussed in previous chapter, when a Web server responds to a HTTP request to the browser, the response typically consists of a status line, some response headers, a blank line, and the document. A typical response looks like this:

HTTP/1.1 200 OK
Content-Type: text/html
Header2: ...
...
HeaderN: ...
  (Blank Line)
<!doctype ...>
<html>
<head>...</head>
<body>
...
</body>
</html>

The status line consists of the HTTP version (HTTP/1.1 in the example), a status code (200 in the example), and a very short message corresponding to the status code (OK in the example).

Following is a summary of the most useful HTTP 1.1 response headers which go back to the browser from web server side and you would use them very frequently in web programming:

Header Description
Allow This header specifies the request methods (GET, POST, etc.) that the server supports.
Cache-Control This header specifies the circumstances in which the response document can safely be cached. It can have values public, private or no-cache etc. Public means document is cacheable, Private means document is for a single user and can only be stored in private (nonshared) caches and no-cache means document should never be cached.
Connection This header instructs the browser whether to use persistent in HTTP connections or not. A value of closeinstructs the browser not to use persistent HTTP connections and keep-alive means using persistent connections.
Content-Disposition This header lets you request that the browser ask the user to save the response to disk in a file of the given name.
Content-Encoding This header specifies the way in which the page was encoded during transmission.
Content-Language This header signifies the language in which the document is written. For example en, en-us, ru, etc.
Content-Length This header indicates the number of bytes in the response. This information is needed only if the browser is using a persistent (keep-alive) HTTP connection.
Content-Type This header gives the MIME (Multipurpose Internet Mail Extension) type of the response document.
Expires This header specifies the time at which the content should be considered out-of-date and thus no longer be cached.
Last-Modified This header indicates when the document was last changed. The client can then cache the document and supply a date by an If-Modified-Since request header in later requests.
Location This header should be included with all responses that have a status code in the 300s. This notifies the browser of the document address. The browser automatically reconnects to this location and retrieves the new document.
Refresh This header specifies how soon the browser should ask for an updated page. You can specify time in number of seconds after which a page would be refreshed.
Retry-After This header can be used in conjunction with a 503 (Service Unavailable) response to tell the client how soon it can repeat its request.
Set-Cookie This header specifies a cookie associated with the page.

Methods to Set HTTP Response Header:

There are following methods which can be used to set HTTP response header in your servlet program. These methods are available with HttpServletResponseobject.

S.N. Method & Description
1 String encodeRedirectURL(String url)Encodes the specified URL for use in the sendRedirect method or, if encoding is not needed, returns the URL unchanged.
2 String encodeURL(String url)Encodes the specified URL by including the session ID in it, or, if encoding is not needed, returns the URL unchanged.
3 boolean containsHeader(String name)Returns a boolean indicating whether the named response header has already been set.
4 boolean isCommitted()Returns a boolean indicating if the response has been committed.
5 void addCookie(Cookie cookie)Adds the specified cookie to the response.
6 void addDateHeader(String name, long date)Adds a response header with the given name and date-value.
7 void addHeader(String name, String value)Adds a response header with the given name and value.
8 void addIntHeader(String name, int value)Adds a response header with the given name and integer value.
9 void flushBuffer()Forces any content in the buffer to be written to the client.
10 void reset()Clears any data that exists in the buffer as well as the status code and headers.
11 void resetBuffer()Clears the content of the underlying buffer in the response without clearing headers or status code.
12 void sendError(int sc)Sends an error response to the client using the specified status code and clearing the buffer.
13 void sendError(int sc, String msg)Sends an error response to the client using the specified status.
14 void sendRedirect(String location)Sends a temporary redirect response to the client using the specified redirect location URL.
15 void setBufferSize(int size)Sets the preferred buffer size for the body of the response.
16 void setCharacterEncoding(String charset)Sets the character encoding (MIME charset) of the response being sent to the client, for example, to UTF-8.
17 void setContentLength(int len)Sets the length of the content body in the response In HTTP servlets, this method sets the HTTP Content-Length header.
18 void setContentType(String type)Sets the content type of the response being sent to the client, if the response has not been committed yet.
19 void setDateHeader(String name, long date)Sets a response header with the given name and date-value.
20 void setHeader(String name, String value)Sets a response header with the given name and value.
21 void setIntHeader(String name, int value)Sets a response header with the given name and integer value.
22 void setLocale(Locale loc)Sets the locale of the response, if the response has not been committed yet.
23 void setStatus(int sc)Sets the status code for this response.

HTTP Header Response Example:

You already have seen setContentType() method working in previous examples and following example would also use same method, additionally we would usesetIntHeader() method to set Refresh header.

// Import required java libraries
import java.io.*;
import javax.servlet.*;
import javax.servlet.http.*;
import java.util.*;
 
// Extend HttpServlet class
public class Refresh extends HttpServlet {
 
  // Method to handle GET method request.
  public void doGet(HttpServletRequest request,
                    HttpServletResponse response)
            throws ServletException, IOException
  {
      // Set refresh, autoload time as 5 seconds
      response.setIntHeader("Refresh", 5);
 
      // Set response content type
      response.setContentType("text/html");
 
      // Get current time
      Calendar calendar = new GregorianCalendar();
      String am_pm;
      int hour = calendar.get(Calendar.HOUR);
      int minute = calendar.get(Calendar.MINUTE);
      int second = calendar.get(Calendar.SECOND);
      if(calendar.get(Calendar.AM_PM) == 0)
        am_pm = "AM";
      else
        am_pm = "PM";
 
      String CT = hour+":"+ minute +":"+ second +" "+ am_pm;
    
      PrintWriter out = response.getWriter();
      String title = "Auto Refresh Header Setting";
      String docType =
      "<!doctype html public \"-//w3c//dtd html 4.0 " +
      "transitional//en\">\n";
      out.println(docType +
        "<html>\n" +
        "<head><title>" + title + "</title></head>\n"+
        "<body bgcolor=\"#f0f0f0\">\n" +
        "<h1 align=\"center\">" + title + "</h1>\n" +
        "<p>Current Time is: " + CT + "</p>\n");
  }
  // Method to handle POST method request.
  public void doPost(HttpServletRequest request,
                     HttpServletResponse response)
      throws ServletException, IOException {
     doGet(request, response);
  }
}

Now calling the above servlet would display current system time after every 5 seconds as follows. Just run the servlet and wait to see the result:

Auto Refresh Header Setting

Current Time is: 9:44:50 PM


SERVLETS(FORMS)

You must have come across many situations when you need to pass some information from your browser to web server and ultimately to your backend program. The browser uses two methods to pass this information to web server. These methods are GET Method and POST Method.

GET method:

The GET method sends the encoded user information appended to the page request. The page and the encoded information are separated by the ? character as follows:

http://www.test.com/hello?key1=value1&key2=value2

The GET method is the defualt method to pass information from browser to web server and it produces a long string that appears in your browser’s Location:box. Never use the GET method if you have password or other sensitive information to pass to the server. The GET method has size limtation: only 1024 characters can be in a request string.

This information is passed using QUERY_STRING header and will be accessible through QUERY_STRING environment variable and Servlet handles this type of requests using doGet() method.

POST method:

A generally more reliable method of passing information to a backend program is the POST method. This packages the information in exactly the same way as GET methods, but instead of sending it as a text string after a ? in the URL it sends it as a separate message. This message comes to the backend program in the form of the standard input which you can parse and use for your processing. Servlet handles this type of requests using doPost() method.

Reading Form Data using Servlet:

Servlets handles form data parsing automatically using the following methods depending on the situation:

  • getParameter(): You call request.getParameter() method to get the value of a form parameter.
  • getParameterValues(): Call this method if the parameter appears more than once and returns multiple values, for example checkbox.
  • getParameterNames(): Call this method if you want a complete list of all parameters in the current request.

GET Method Example Using URL:

Here is a simple URL which will pass two values to HelloForm program using GET method.

http://localhost:8080/HelloForm?first_name=ZARA&last_name=ALI

Below is HelloForm.java servlet program to handle input given by web browser. We are going to use getParameter() method which makes it very easy to access passed information:

// Import required java libraries
import java.io.*;
import javax.servlet.*;
import javax.servlet.http.*;

// Extend HttpServlet class
public class HelloForm extends HttpServlet {
 
  public void doGet(HttpServletRequest request,
                    HttpServletResponse response)
            throws ServletException, IOException
  {
      // Set response content type
      response.setContentType("text/html");

      PrintWriter out = response.getWriter();
	  String title = "Using GET Method to Read Form Data";
      String docType =
      "<!doctype html public \"-//w3c//dtd html 4.0 " +
      "transitional//en\">\n";
      out.println(docType +
                "<html>\n" +
                "<head><title>" + title + "</title></head>\n" +
                "<body bgcolor=\"#f0f0f0\">\n" +
                "<h1 align=\"center\">" + title + "</h1>\n" +
                "<ul>\n" +
                "  <li><b>First Name</b>: "
                + request.getParameter("first_name") + "\n" +
                "  <li><b>Last Name</b>: "
                + request.getParameter("last_name") + "\n" +
                "</ul>\n" +
                "</body></html>");
  }
}

Assuming your environment is setup properly, compile HelloForm.java as follows:

$ javac HelloForm.java

If everything goes fine, above compilation would produce HelloForm.class file. Next you would have to copy this class file in <Tomcat-installation-directory>/webapps/ROOT/WEB-INF/classes and create following entries inweb.xml file located in <Tomcat-installation-directory>/webapps/ROOT/WEB-INF/

    <servlet>
        <servlet-name>HelloForm</servlet-name>
        <servlet-class>HelloForm</servlet-class>
    </servlet>

    <servlet-mapping>
        <servlet-name>HelloForm</servlet-name>
        <url-pattern>/HelloForm</url-pattern>
    </servlet-mapping>

Now type http://localhost:8080/HelloForm?first_name=ZARA&last_name=ALIin your browser’s Location:box and make sure you already started tomcat server, before firing above command in the browser. This would generate following result:

Using GET Method to Read Form Data

  • First Name: ZARA
  • Last Name: ALI

GET Method Example Using Form:

Here is a simple example which passes two values using HTML FORM and submit button. We are going to use same Servlet HelloForm to handle this imput.

<html>
<body>
<form action="HelloForm" method="GET">
First Name: <input type="text" name="first_name">
<br />
Last Name: <input type="text" name="last_name" />
<input type="submit" value="Submit" />
</form>
</body>
</html>

Keep this HTML in a file Hello.htm and put it in <Tomcat-installation-directory>/webapps/ROOT directory. When you would accesshttp://localhost:8080/Hello.htm, here is the actual output of the above form.

First Name: Last Name: Try to enter First Name and Last Name and then click submit button to see the result on your local machine where tomcat is running. Based on the input provided, it will generate similar result as mentioned in the above example.

POST Method Example Using Form:

Let us do little modification in the above servlet, so that it can handle GET as well as POST methods. Below is HelloForm.java servlet program to handle input given by web browser using GET or POST methods.

// Import required java libraries
import java.io.*;
import javax.servlet.*;
import javax.servlet.http.*;

// Extend HttpServlet class
public class HelloForm extends HttpServlet {
 
  // Method to handle GET method request.
  public void doGet(HttpServletRequest request,
                    HttpServletResponse response)
            throws ServletException, IOException
  {
      // Set response content type
      response.setContentType("text/html");

      PrintWriter out = response.getWriter();
	  String title = "Using GET Method to Read Form Data";
      String docType =
      "<!doctype html public \"-//w3c//dtd html 4.0 " +
      "transitional//en\">\n";
      out.println(docType +
                "<html>\n" +
                "<head><title>" + title + "</title></head>\n" +
                "<body bgcolor=\"#f0f0f0\">\n" +
                "<h1 align=\"center\">" + title + "</h1>\n" +
                "<ul>\n" +
                "  <li><b>First Name</b>: "
                + request.getParameter("first_name") + "\n" +
                "  <li><b>Last Name</b>: "
                + request.getParameter("last_name") + "\n" +
                "</ul>\n" +
                "</body></html>");
  }
  // Method to handle POST method request.
  public void doPost(HttpServletRequest request,
                     HttpServletResponse response)
      throws ServletException, IOException {
     doGet(request, response);
  }
}

Now compile, deploy the above Servlet and test it using Hello.htm with the POST method as follows:

<html>
<body>
<form action="HelloForm" method="POST">
First Name: <input type="text" name="first_name">
<br />
Last Name: <input type="text" name="last_name" />
<input type="submit" value="Submit" />
</form>
</body>
</html>

Here is the actual output of the above form, Try to enter First and Last Name and then click submit button to see the result on your local machine where tomcat is running.

First Name: Last Name: Based on the input provided, it would generate similar result as mentioned in the above examples.

Passing Checkbox Data to Servlet Program

Checkboxes are used when more than one option is required to be selected.

Here is example HTML code, CheckBox.htm, for a form with two checkboxes

<html>
<body>
<form action="CheckBox" method="POST" target="_blank">
<input type="checkbox" name="maths" checked="checked" /> Maths
<input type="checkbox" name="physics"  /> Physics
<input type="checkbox" name="chemistry" checked="checked" /> 
                                                Chemistry
<input type="submit" value="Select Subject" />
</form>
</body>
</html>

The result of this code is the following form

Maths Physics Chemistry Below is CheckBox.java servlet program to handle input given by web browser for checkbox button.

// Import required java libraries
import java.io.*;
import javax.servlet.*;
import javax.servlet.http.*;

// Extend HttpServlet class
public class CheckBox extends HttpServlet {
 
  // Method to handle GET method request.
  public void doGet(HttpServletRequest request,
                    HttpServletResponse response)
            throws ServletException, IOException
  {
      // Set response content type
      response.setContentType("text/html");

      PrintWriter out = response.getWriter();
	  String title = "Reading Checkbox Data";
      String docType =
      "<!doctype html public \"-//w3c//dtd html 4.0 " +
      "transitional//en\">\n";
      out.println(docType +
                "<html>\n" +
                "<head><title>" + title + "</title></head>\n" +
                "<body bgcolor=\"#f0f0f0\">\n" +
                "<h1 align=\"center\">" + title + "</h1>\n" +
                "<ul>\n" +
                "  <li><b>Maths Flag : </b>: "
                + request.getParameter("maths") + "\n" +
                "  <li><b>Physics Flag: </b>: "
                + request.getParameter("physics") + "\n" +
                "  <li><b>Chemistry Flag: </b>: "
                + request.getParameter("chemistry") + "\n" +
                "</ul>\n" +
                "</body></html>");
  }
  // Method to handle POST method request.
  public void doPost(HttpServletRequest request,
                     HttpServletResponse response)
      throws ServletException, IOException {
     doGet(request, response);
  }
}

For the above example, it would display following result:

Reading Checkbox Data

  • Maths Flag : : on
  • Physics Flag: : null
  • Chemistry Flag: : on

Reading All Form Parameters:

Following is the generic example which uses getParameterNames() method of HttpServletRequest to read all the available form parameters. This method returns an Enumeration that contains the parameter names in an unspecified order.

Once we have an Enumeration, we can loop down the Enumeration in the standard manner, using hasMoreElements() method to determine when to stop and using nextElement() method to get each parameter name.

// Import required java libraries
import java.io.*;
import javax.servlet.*;
import javax.servlet.http.*;
import java.util.*;

// Extend HttpServlet class
public class ReadParams extends HttpServlet {
 
  // Method to handle GET method request.
  public void doGet(HttpServletRequest request,
                    HttpServletResponse response)
            throws ServletException, IOException
  {
      // Set response content type
      response.setContentType("text/html");

      PrintWriter out = response.getWriter();
	  String title = "Reading All Form Parameters";
      String docType =
      "<!doctype html public \"-//w3c//dtd html 4.0 " +
      "transitional//en\">\n";
      out.println(docType +
        "<html>\n" +
        "<head><title>" + title + "</title></head>\n" +
        "<body bgcolor=\"#f0f0f0\">\n" +
        "<h1 align=\"center\">" + title + "</h1>\n" +
        "<table width=\"100%\" border=\"1\" align=\"center\">\n" +
        "<tr bgcolor=\"#949494\">\n" +
        "<th>Param Name</th><th>Param Value(s)</th>\n"+
        "</tr>\n");

      Enumeration paramNames = request.getParameterNames();
      
      while(paramNames.hasMoreElements()) {
         String paramName = (String)paramNames.nextElement();
         out.print("<tr><td>" + paramName + "</td>\n<td>");
         String[] paramValues =
                request.getParameterValues(paramName);
         // Read single valued data
         if (paramValues.length == 1) {
           String paramValue = paramValues[0];
           if (paramValue.length() == 0)
             out.println("<i>No Value</i>");
           else
             out.println(paramValue);
         } else {
             // Read multiple valued data
             out.println("<ul>");
             for(int i=0; i < paramValues.length; i++) {
                out.println("<li>" + paramValues[i]);
             }
             out.println("</ul>");
         }
      }
      out.println("</tr>\n</table>\n</body></html>");
  }
  // Method to handle POST method request.
  public void doPost(HttpServletRequest request,
                     HttpServletResponse response)
      throws ServletException, IOException {
     doGet(request, response);
  }
}

Now, try above servlet with the following form:

<html>
<body>
<form action="ReadParams" method="POST" target="_blank">
<input type="checkbox" name="maths" checked="checked" /> Maths
<input type="checkbox" name="physics"  /> Physics
<input type="checkbox" name="chemistry" checked="checked" /> Chem
<input type="submit" value="Select Subject" />
</form>
</body>
</html>

Now calling servlet using above form would generate following result:

Reading All Form Parameters

Param Name Param Value(s)
maths on
chemistry on

You can try above servlet to read any other form’s data which is having other objects like text box, radio button or drop down box etc.

DEPLOYMENT EXAMPLE

Servlets are Java classes which service HTTP requests and implement thejavax.servlet.Servlet interface. Web application developers typically write servlets that extend javax.servlet.http.HttpServlet, an abstract class that implements the Servlet interface and is specially designed to handle HTTP requests.

Sample Code for Hello World:

Following is the sample source code structure of a servlet example to write Hello World:

// Import required java libraries
import java.io.*;
import javax.servlet.*;
import javax.servlet.http.*;

// Extend HttpServlet class
public class HelloWorld extends HttpServlet {
 
  private String message;

  public void init() throws ServletException
  {
      // Do required initialization
      message = "Hello World";
  }

  public void doGet(HttpServletRequest request,
                    HttpServletResponse response)
            throws ServletException, IOException
  {
      // Set response content type
      response.setContentType("text/html");

      // Actual logic goes here.
      PrintWriter out = response.getWriter();
      out.println("<h1>" + message + "</h1>");
  }
  
  public void destroy()
  {
      // do nothing.
  }
}

Compiling a Servlet:

Let us put above code if HelloWorld.java file and put this file in C:\ServletDevel (Windows) or /usr/ServletDevel (Unix) then you would need to add these directories as well in CLASSPATH.

Assuming your environment is setup properly, go in ServletDevel directory and compile HelloWorld.java as follows:

$ javac HelloWorld.java

If the servlet depends on any other libraries, you have to include those JAR files on your CLASSPATH as well. I have included only servlet-api.jar JAR file because I’m not using any other library in Hello World program.

This command line uses the built-in javac compiler that comes with the Sun Microsystems Java Software Development Kit (JDK). For this command to work properly, you have to include the location of the Java SDK that you are using in the PATH environment variable.

If everything goes fine, above compilation would produce HelloWorld.class file in the same directory. Next section would explain how a compiled servlet would be deployed in production.

Servlet Deployment:

By default, a servlet application is located at the path <Tomcat-installation-directory>/webapps/ROOT and the class file would reside in <Tomcat-installation-directory>/webapps/ROOT/WEB-INF/classes.

If you have a fully qualified class name of com.myorg.MyServlet, then this servlet class must be located in WEB-INF/classes/com/myorg/MyServlet.class.

For now, let us copy HelloWorld.class into <Tomcat-installation-directory>/webapps/ROOT/WEB-INF/classes and create following entries inweb.xml file located in <Tomcat-installation-directory>/webapps/ROOT/WEB-INF/

<servlet>
   <servlet-name>HelloWorld</servlet-name>
   <servlet-class>HelloWorld</servlet-class>
</servlet>

<servlet-mapping>
   <servlet-name>HelloWorld</servlet-name>
   <url-pattern>/HelloWorld</url-pattern>
</servlet-mapping>

Above entries to be created inside <web-app>…</web-app> tags available in web.xml file. There could be various entries in this table already available, but never mind.

You are almost done, now let us start tomcat server using <Tomcat-installation-directory>\bin\startup.bat (on windows) or <Tomcat-installation-directory>/bin/startup.sh (on Linux/Solaris etc.) and finally typehttp://localhost:8080/HelloWorld in browser’s address box. If everything goes fine, you would get following result:

Servlet Example

SERVLETS

Java Servlets are programs that run on a Web or Application server and act as a middle layer between a request coming from a Web browser or other HTTP client and databases or applications on the HTTP server.

Using Servlets, you can collect input from users through web page forms, present records from a database or another source, and create web pages dynamically.

Java Servlets often serve the same purpose as programs implemented using the Common Gateway Interface (CGI). But Servlets offer several advantages in comparison with the CGI.

  • Performance is significantly better.
  • Servlets execute within the address space of a Web server. It is not necessary to create a separate process to handle each client request.
  • Servlets are platform-independent because they are written in Java.
  • Java security manager on the server enforces a set of restrictions to protect the resources on a server machine. So servlets are trusted.
  • The full functionality of the Java class libraries is available to a servlet. It can communicate with applets, databases, or other software via the sockets and RMI mechanisms that you have seen already.

Servlets Architecture:

Following diagram shows the position of Servelts in a Web Application.

Servlets Architecture

Servlets Tasks:

Servlets perform the following major tasks:

  • Read the explicit data sent by the clients (browsers). This includes an HTML form on a Web page or it could also come from an applet or a custom HTTP client program.
  • Read the implicit HTTP request data sent by the clients (browsers). This includes cookies, media types and compression schemes the browser understands, and so forth.
  • Process the data and generate the results. This process may require talking to a database, executing an RMI or CORBA call, invoking a Web service, or computing the response directly.
  • Send the explicit data (i.e., the document) to the clients (browsers). This document can be sent in a variety of formats, including text (HTML or XML), binary (GIF images), Excel, etc.
  • Send the implicit HTTP response to the clients (browsers). This includes telling the browsers or other clients what type of document is being returned (e.g., HTML), setting cookies and caching parameters, and other such tasks.

Servlets Packages:

Java Servlets are Java classes run by a web server that has an interpreter that supports the Java Servlet specification.

Servlets can be created using the javax.servlet and javax.servlet.httppackages, which are a standard part of the Java’s enterprise edition, an expanded version of the Java class library that supports large-scale development projects.

These classes implement the Java Servlet and JSP specifications. At the time of writing this tutorial, the versions are Java Servlet 2.5 and JSP 2.1.

Java servlets have been created and compiled just like any other Java class. After you install the servlet packages and add them to your computer’s Classpath, you can compile servlets with the JDK’s Java compiler or any other current compiler.

A servlet life cycle can be defined as the entire process from its creation till the destruction. The following are the paths followed by a servlet

  • The servlet is initialized by calling the init () method.
  • The servlet calls service() method to process a client’s request.
  • The servlet is terminated by calling the destroy() method.
  • Finally, servlet is garbage collected by the garbage collector of the JVM.

Now let us discuss the life cycle methods in details.

The init() method :

The init method is designed to be called only once. It is called when the servlet is first created, and not called again for each user request. So, it is used for one-time initializations, just as with the init method of applets.

The servlet is normally created when a user first invokes a URL corresponding to the servlet, but you can also specify that the servlet be loaded when the server is first started.

When a user invokes a servlet, a single instance of each servlet gets created, with each user request resulting in a new thread that is handed off to doGet or doPost as appropriate. The init() method simply creates or loads some data that will be used throughout the life of the servlet.

The init method definition looks like this:

public void init() throws ServletException {
  // Initialization code...
}

The service() method :

The service() method is the main method to perform the actual task. The servlet container (i.e. web server) calls the service() method to handle requests coming from the client( browsers) and to write the formatted response back to the client.

Each time the server receives a request for a servlet, the server spawns a new thread and calls service. The service() method checks the HTTP request type (GET, POST, PUT, DELETE, etc.) and calls doGet, doPost, doPut, doDelete, etc. methods as appropriate.

Here is the signature of this method:

public void service(ServletRequest request, 
                    ServletResponse response) 
      throws ServletException, IOException{
}

The service () method is called by the container and service method invokes doGe, doPost, doPut, doDelete, etc. methods as appropriate. So you have nothing to do with service() method but you override either doGet() or doPost() depending on what type of request you receive from the client.

The doGet() and doPost() are most frequently used methods with in each service request. Here is the signature of these two methods.

The doGet() Method

A GET request results from a normal request for a URL or from an HTML form that has no METHOD specified and it should be handled by doGet() method.

public void doGet(HttpServletRequest request,
                  HttpServletResponse response)
    throws ServletException, IOException {
    // Servlet code
}

The doPost() Method

A POST request results from an HTML form that specifically lists POST as the METHOD and it should be handled by doPost() method.

public void doPost(HttpServletRequest request,
                   HttpServletResponse response)
    throws ServletException, IOException {
    // Servlet code
}

The destroy() method :

The destroy() method is called only once at the end of the life cycle of a servlet. This method gives your servlet a chance to close database connections, halt background threads, write cookie lists or hit counts to disk, and perform other such cleanup activities.

After the destroy() method is called, the servlet object is marked for garbage collection. The destroy method definition looks like this:

  public void destroy() {
    // Finalization code...
  }

Architecture Digram:

The following figure depicts a typical servlet life-cycle scenario.

  • First the HTTP requests coming to the server are delegated to the servlet container.
  • The servlet container loads the servlet before invoking the service() method.
  • Then the servlet container handles multiple requests by spawning multiple threads, each thread executing the service() method of a single instance of the servlet.

Servlet Life Cycle

ORACLE

Structured Query Language (SQL) is the set of statements with which all programs and users access data in an Oracle database. Application programs and Oracle tools often allow users access to the database without using SQL directly, but these applications in turn must use SQL when executing the user’s request. This chapter provides background information on SQL as used by most database systems.

An Oracle database is a collection of data treated as a unit. The purpose of a database is to store and retrieve related information. A database server is the key to solving the problems of information management. In general, a server reliably manages a large amount of data in a multiuser environment so that many users can concurrently access the same data. All this is accomplished while delivering high performance. A database server also prevents unauthorized access and provides efficient solutions for failure recovery.

Oracle Database is the first database designed for enterprise grid computing, the most flexible and cost effective way to manage information and applications. Enterprise grid computing creates large pools of industry-standard, modular storage and servers. With this architecture, each new system can be rapidly provisioned from the pool of components. There is no need for peak workloads, because capacity can be easily added or reallocated from the resource pools as needed.

The database has logical structures and physical structures. Because the physical and logical structures are separate, the physical storage of data can be managed without affecting the access to logical storage structures.


TCP PORT CONFLICT

This is a list of Internet socket port numbers used by protocols of the transport layer of the Internet Protocol Suite for the establishment of host-to-host connectivity.

Originally, port numbers were used by the Network Control Program (NCP) in the ARPANET for which two ports were required for half-duplex transmission. Later, the Transmission Control Protocol (TCP) and the User Datagram Protocol (UDP) needed only one port for full-duplex, bidirectional traffic. The even-numbered ports were not used, and this resulted in some even numbers in the well-known port number range being unassigned. The Stream Control Transmission Protocol (SCTP) and the Datagram Congestion Control Protocol(DCCP) also use port numbers. They usually use port numbers that match the services of the corresponding TCP or UDP implementation, if they exist.

The Internet Assigned Numbers Authority (IANA) is responsible for maintaining the official assignments of port numbers for specific uses.[5] However, many unofficial uses of both well-known and registered port numbers occur in practice.

Oracle (database) can use many ports. when you install the software it scans for free ports and decides which port to use then.The database listener defaults to 1520 but will use 1521 or 1522 if 1520 is not available. This can be adjusted in the listener.ora files.The Enterprise Manager, web-based database administration tool defaults to port 80 but will use 8080 if 80 is not available.

COMMANDS

SQL Statement Syntax
AND / OR SELECT column_name(s)
FROM table_name
WHERE condition
AND|OR condition
ALTER TABLE ALTER TABLE table_name
ADD column_name datatypeorALTER TABLE table_name
DROP COLUMN column_name
AS (alias) SELECT column_name AS column_alias
FROM table_nameorSELECT column_name
FROM table_name  AS table_alias
BETWEEN SELECT column_name(s)
FROM table_name
WHERE column_name
BETWEEN value1 AND value2
CREATE DATABASE CREATE DATABASE database_name
CREATE TABLE CREATE TABLE table_name
(
column_name1 data_type,
column_name2 data_type,
column_name3 data_type,

)
CREATE INDEX CREATE INDEX index_name
ON table_name (column_name)orCREATE UNIQUE INDEX index_name
ON table_name (column_name)
CREATE VIEW CREATE VIEW view_name AS
SELECT column_name(s)
FROM table_name
WHERE condition
DELETE DELETE FROM table_name
WHERE some_column=some_valueorDELETE FROM table_name
(Note: Deletes the entire table!!)

DELETE * FROM table_name
(Note: Deletes the entire table!!)

DROP DATABASE DROP DATABASE database_name
DROP INDEX DROP INDEX table_name.index_name (SQL Server)
DROP INDEX index_name ON table_name (MS Access)
DROP INDEX index_name (DB2/Oracle)
ALTER TABLE table_name
DROP INDEX index_name (MySQL)
DROP TABLE DROP TABLE table_name
EXISTS IF EXISTS (SELECT * FROM table_name WHERE id = ?)
BEGIN
–do what needs to be done if exists
END
ELSE
BEGIN
–do what needs to be done if not
END
GROUP BY SELECT column_name, aggregate_function(column_name)
FROM table_name
WHERE column_name operator value
GROUP BY column_name
HAVING SELECT column_name, aggregate_function(column_name)
FROM table_name
WHERE column_name operator value
GROUP BY column_name
HAVING aggregate_function(column_name) operator value
IN SELECT column_name(s)
FROM table_name
WHERE column_name
IN (value1,value2,..)
INSERT INTO INSERT INTO table_name
VALUES (value1, value2, value3,….)orINSERT INTO table_name
(column1, column2, column3,…)
VALUES (value1, value2, value3,….)
INNER JOIN SELECT column_name(s)
FROM table_name1
INNER JOIN table_name2
ON table_name1.column_name=table_name2.column_name
LEFT JOIN SELECT column_name(s)
FROM table_name1
LEFT JOIN table_name2
ON table_name1.column_name=table_name2.column_name
RIGHT JOIN SELECT column_name(s)
FROM table_name1
RIGHT JOIN table_name2
ON table_name1.column_name=table_name2.column_name
FULL JOIN SELECT column_name(s)
FROM table_name1
FULL JOIN table_name2
ON table_name1.column_name=table_name2.column_name
LIKE SELECT column_name(s)
FROM table_name
WHERE column_name LIKE pattern
ORDER BY SELECT column_name(s)
FROM table_name
ORDER BY column_name [ASC|DESC]
SELECT SELECT column_name(s)
FROM table_name
SELECT * SELECT *
FROM table_name
SELECT DISTINCT SELECT DISTINCT column_name(s)
FROM table_name
SELECT INTO SELECT *
INTO new_table_name [IN externaldatabase]
FROM old_table_nameorSELECT column_name(s)
INTO new_table_name [IN externaldatabase]
FROM old_table_name
SELECT TOP SELECT TOP number|percent column_name(s)
FROM table_name
TRUNCATE TABLE TRUNCATE TABLE table_name
UNION SELECT column_name(s) FROM table_name1
UNION
SELECT column_name(s) FROM table_name2
UNION ALL SELECT column_name(s) FROM table_name1
UNION ALL
SELECT column_name(s) FROM table_name2
UPDATE UPDATE table_name
SET column1=value, column2=value,…
WHERE some_column=some_value
WHERE SELECT column_name(s)
FROM table_name
WHERE column_name operator value


ECLIPSE

1.  How to Install Eclipse 4.5 (Mars) for Java

1.1  For Windows

Step 0: Install JDK

To use Eclipse for Java programming, you need to first install Java Development Kit (JDK). Read “How to Install JDK (on Windows)“.

Step 1: Download

Download Eclipse from http://www.eclipse.org/downloads. For beginners, choose “Eclipse IDE for Java Developers” (32-bit or 64-bit) (e.g., “eclipse-java-luna-SR1a-win32-x86_64.zip“).

Step 2: Unzip

To install Eclipse, simply unzip the downloaded file into a directory of your choice (e.g., “d:\myproject“).

There is no need to run any installer. Moreover, you can simply delete the entire Eclipse directory when it is no longer needed (without running any un-installer). You are free to move or rename the directory. You can install (unzip) multiple copies of Eclipse in the same machine.

1.2  For Macs

Read “How to Install Eclipse on Mac“.

1.3  For Ubuntu Linux

Read “How to Install Eclipse on Ubuntu“.

2.  Writing your First Java Program in Eclipse

Step 0: Launch Eclipse
  1. Start Eclipse by running “eclipse.exe” in the Eclipse installed directory.
  2. Choose an appropriate directory for your workspace (i.e., where you would like to save your files).
  3. If the “Welcome” screen shows up, close it by clicking the “close” button.
Step 1: Create a new Java Project

For each Java application, you need to create a project to keep all the source files, classes and relevant resources.

To create a new Java project:

  1. Choose “File” menu ⇒ “New” ⇒ “Java project”.
  2. The “New Java Project” dialog pops up.
    1. In the “Project name” field, enter “FirstProject“.
    2. Check “Use default location”.
    3. In the “JRE” box, select “Use default JRE (currently ‘JDK1.x’)”. But check the JDK version, you should be using JDK 1.5 and above.
    4. Click “Finish”.
Step 2: Write a Hello-world Java Program
  1. In the “Package Explorer” (left panel) ⇒ Right-click on “FirstProject” (or use the “File” menu) ⇒ New ⇒ Class.
  2. The “New Java Class” dialog pops up.
    1. In “Name” field, enter “Hello“.
    2. In “package” field, delete the content if it is not empty.
    3. Check “public static void main(String[] args)” box.
    4. Click “Finish”.
  3. The source file “Hello.java” opens on the editor panel. Enter the following codes:
    public class Hello {   // "Hello.java"
       public static void main(String[] args) {
          System.out.println("Hello, world!");
       }
    }
Step 3: Compile & Execute the Java Program
  1. There is no need to compile the Java source file explicitly. It is because Eclipse performs the so-called incremental compilation, i.e., the Java statement is compiled as and when it is entered.
  2. To run the program, right-click anywhere on the source file “Hello.java” (or from the “Run” menu) ⇒ Choose “Run As” ⇒ “Java Application”.
  3. The output “Hello, world!” appears on the “Console” panel.

NOTES:

  • You should create a new Java project for each of your Java application.
  • Nonetheless, Eclipse allows you to keep more than one programs in a project, which is handy for writing toy programs (such as your tutorial exercises). If you have more than one files with main()method in one project, you need to right-click the source and choose “Run As” ⇒ “Java Application” to run that particular source. Clicking the “Run” button runs the recently-run program (based on the previous configuration). Try clicking on the “down-arrow” besides the “Run” button.

     important links

SERVER SIDE ENVIRONMENT

Introduction

The general distinction between an interactive web site of any kind and a “web application” is unclear. Web sites most likely to be referred to as “web applications” are those which have similar functionality to a desktop software application, or to a mobile app. HTML5 introduced explicit language support for making applications that are loaded as web pages, but can store data locally and continue to function while offline.

Single-page applications are more application-like because they reject the more typical web paradigm of moving between distinct pages with different URLs. Single-page frameworks like Sencha Touch and AngularJS might be used to speed development of such a web app for a mobile platform.

a server is a computer program or a device that provides functionality for other programs or devices, called “clients“. Thisarchitecture is called the client–server model, and a single overall computation is distributed across multiple processes or devices.[1]Servers can provide various functionalities, often called “services”, such as sharing data or resources among multiple clients, or performing computation for a client. A single server can serve multiple clients, and a single client can use multiple servers. A client process may run on the same device or may connect over a network to a server on a different device.[2] Typical servers are database servers, file servers, mail servers, print servers, web servers, game servers, and application servers.[3]

webserver.gif

Web application servers are designed specifically to extend web servers to support dynamic content. The application server software “hooks in” to the web server software and automatically intercepts any user requests for dynamic content. The web server still sends out static web pages and graphic files–Just like before. But now, the application server can create dynamic content by mixing data with templates, running programs, or by accessing databases.appserver.gif

Java 2 Enterprise Edition (J2EE) is a great choice for enterprise and mission critical applications. It is highly scalable and can run under almost any operating system from Windows to high-end Unix servers. J2EE code is written in Java.

J2EE application servers are available from over 30 vendors including IBM (WebSphere), Sun (iPlanet) BEA (WebLogic), Macromedia (jRun). There are even several open source J2EE servers (Tomcat, Resin, & jBoss).

TOMCAT

Apache Tomcat, often referred to as Tomcat, is an open-source web server developed by the Apache Software Foundation (ASF). Tomcat implements several Java EE specifications including Java Servlet, JavaServer Pages (JSP), Java EL, and WebSocket, and provides a “pure JavaHTTP web server environment in which Java code can run.

Tomcat is developed and maintained by an open community of developers under the auspices of the Apache Software Foundation, released under the Apache License 2.0 license, and is open-source software.

tomcat-file-structure.png

TOMCAT FILE SYSTEM

  • bin- contains the binary files used at starting and shut down,
  • webapps- applications are deployed here,
  • lib- contains the library files,
  • conf-contains port no. unique id of web app server.


REQUEST

The Hypertext Transfer Protocol (HTTP) is an application protocol for distributed, collaborative, hypermedia information systems.[1]HTTP is the foundation of data communication for the World Wide Web.

Hypertext is structured text that uses logical links (hyperlinks) between nodes containing text. HTTP is the protocol to exchange or transfer hypertext.

Development of HTTP was initiated by Tim Berners-Lee at CERN in 1989. Standards development of HTTP was coordinated by theInternet Engineering Task Force (IETF) and the World Wide Web Consortium (W3C), culminating in the publication of a series ofRequests for Comments (RFCs). The first definition of HTTP/1.1, the version of HTTP in common use, occurred in RFC 2068 in 1997, although this was obsoleted by RFC 2616 in 1999.

A later version, the successor HTTP/2, was standardized in 2015, and is now supported by major web servers.

Request methods

An HTTP  request made using telnet. The request message, responseheader section, and response body are highlighted.HTTP defines methods (sometimes referred to as verbs) to indicate the desired action to be performed on the identified resource. What this resource represents, whether pre-existing data or data that is generated dynamically, depends on the implementation of the server. Often, the resource corresponds to a file or the output of an executable residing on the server. The HTTP/1.0 specification[11] defined the GET, POST and HEAD methods and the HTTP/1.1 specification[12] added 5 new methods: OPTIONS, PUT, DELETE, TRACE and CONNECT. By being specified in these documents their semantics are well known and can be depended on. Any client can use any method and the server can be configured to support any combination of methods. If a method is unknown to an intermediate it will be treated as an unsafe and non-idempotent method. There is no limit to the number of methods that can be defined and this allows for future methods to be specified without breaking existing infrastructure. For example, WebDAV defined 7 new methods and RFC 5789specified the PATCH method.

GET
The GET method requests a representation of the specified resource. Requests using GET should only retrieve data and should have no other effect. (This is also true of some other HTTP methods.)[1] The W3C has published guidance principles on this distinction, saying, “Web application design should be informed by the above principles, but also by the relevant limitations.”[13] See safe methods below.
HEAD
The HEAD method asks for a response identical to that of a GET request, but without the response body. This is useful for retrieving meta-information written in response headers, without having to transport the entire content.
POST
The POST method requests that the server accept the entity enclosed in the request as a new subordinate of the web resource identified by the URI. The data POSTed might be, for example, an annotation for existing resources; a message for a bulletin board, newsgroup, mailing list, or comment thread; a block of data that is the result of submitting a web form to a data-handling process; or an item to add to a database.[14]
PUT
The PUT method requests that the enclosed entity be stored under the supplied URI. If the URI refers to an already existing resource, it is modified; if the URI does not point to an existing resource, then the server can create the resource with that URI.[15]
DELETE
The DELETE method deletes the specified resource.
TRACE
The TRACE method echoes the received request so that a client can see what (if any) changes or additions have been made by intermediate servers.

RESPONSE

After receiving and interpreting a request message, a server responds with an HTTP response message

URL

Every document on the Web has a unique address. This address is known asUniform Resource Locator (URL).

Several HTML/XHTML tags include a URL attribute value, including hyperlinks, inline images, and forms. All of them use the same syntax to specify the location of a web resource, regardless of the type or content of that resource. That’s why it is known a Uniform Resource Locator.

URL Elements

A URL is made of up several parts, each of which offers information to the web browser to help find the page. It is easier to learn the parts of a URL, if you look at the example URL given below, there are three key parts: the scheme, the host address, and the file path.

Absolute and Relative URLs

You may address a URL in one of the following two ways:

  • Absolute – An absolute URL is the complete address of a resource. For example https://www.tutorialspoint.com/html/html_text_links.htm
  • Relative – A relative URL indicates where the resource is in relation to the current page. Given URL is added with the <base> element to form a complete URL. For example /html/html_text_links.html